Kindle Create is an Amazon program that helps users create ebooks for publication on Kindle Direct Publishing (KDP). I'll tell you all about it and give you a step-by-step tutorial for making your own ebook with Kindle Create. Then I'll tell you why I hate it. :)
What is Kindle Create?
Kindle Create is a free desktop application from Amazon to help authors and publishers get their ebook ready for publication on their Kindle Direct Publishing (KDP) platform. While the program is marketed as a formatting software, I have to disagree. Kindle Create is essentially a souped-up file converter that accepts a document you’ve already formatted in a program like Microsoft Word, allows small tweaks, and exports as an ebook file format.
Kindle Create is the most direct and clean way to create a KPF, Kindle’s preferred upload types for ebooks, and the service is free, so if you’re publishing ebooks through KDP, Kindle Create can help you be sure you have a product that will ultimately look good and work functionally as an ebook on KDP.
Note: There are other file types you can use on KDP—KPFs are just their preference. Here are all of the file formats acceptable on Kindle Direct Publishing.
Kindle Create Tutorial
Here’s your step-by-step tutorial for creating an ebook—KPF or EPUB—in Kindle Create.
1. Create Your Project
After you've installed Kindle Create, you need to start with a formatted ebook document (you know, the thing all formatting programs require 🥴).
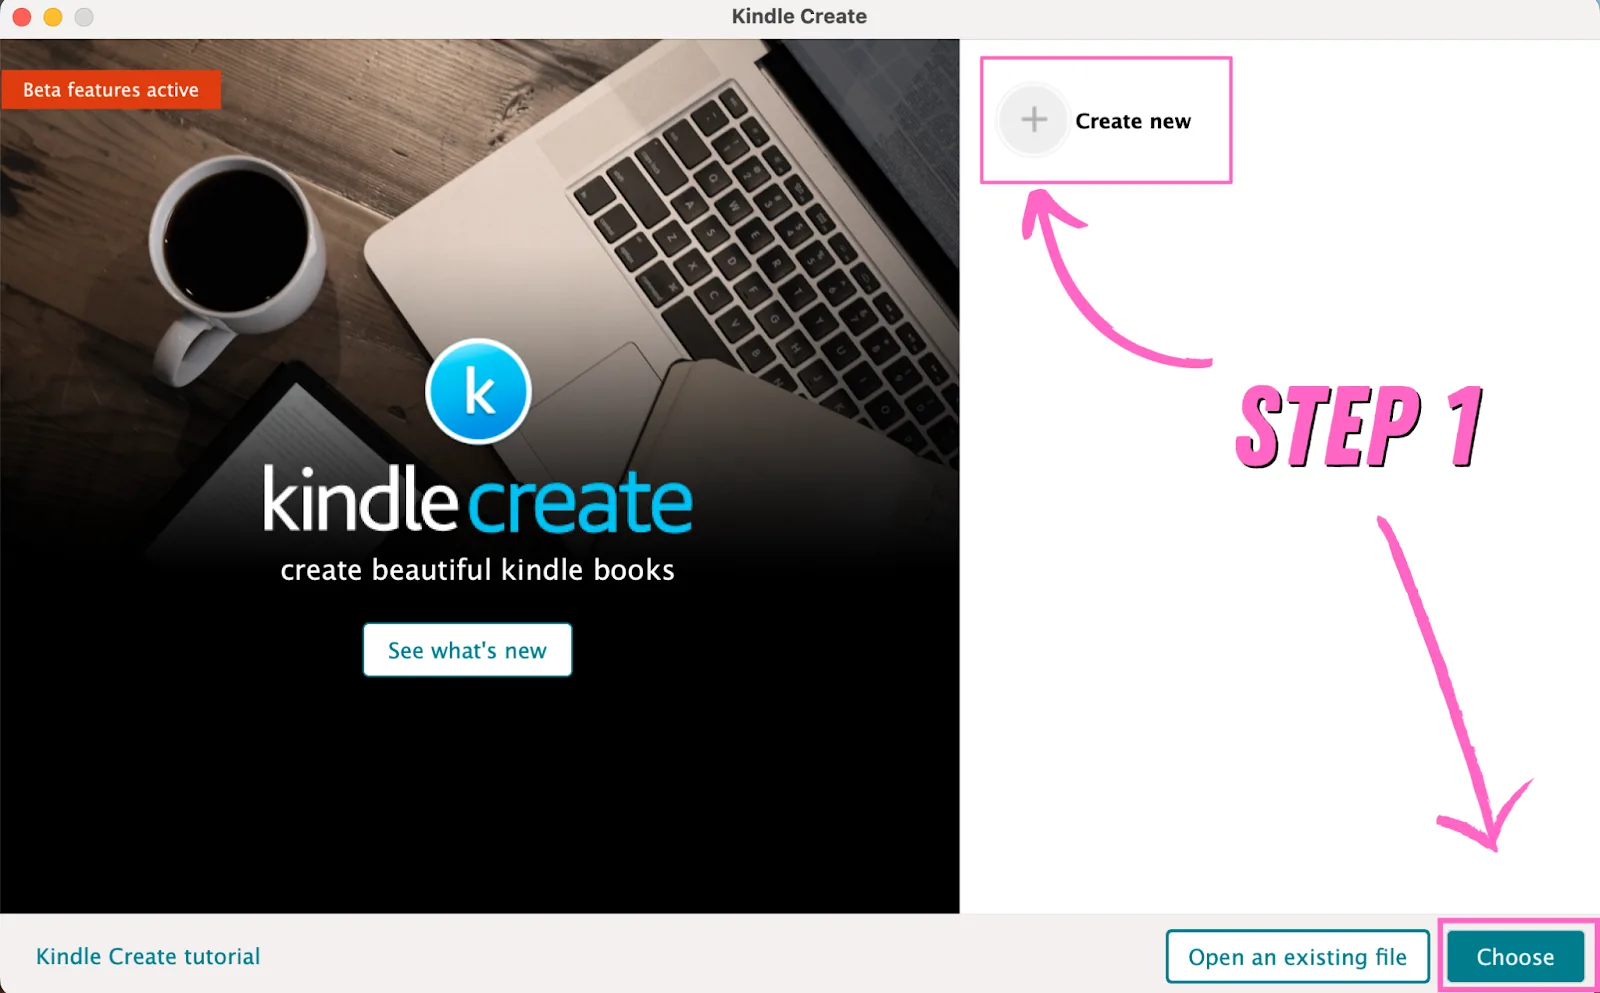
Then we can hit "+ Create new" and "Choose" to create a new project.
2. Choose Your Format
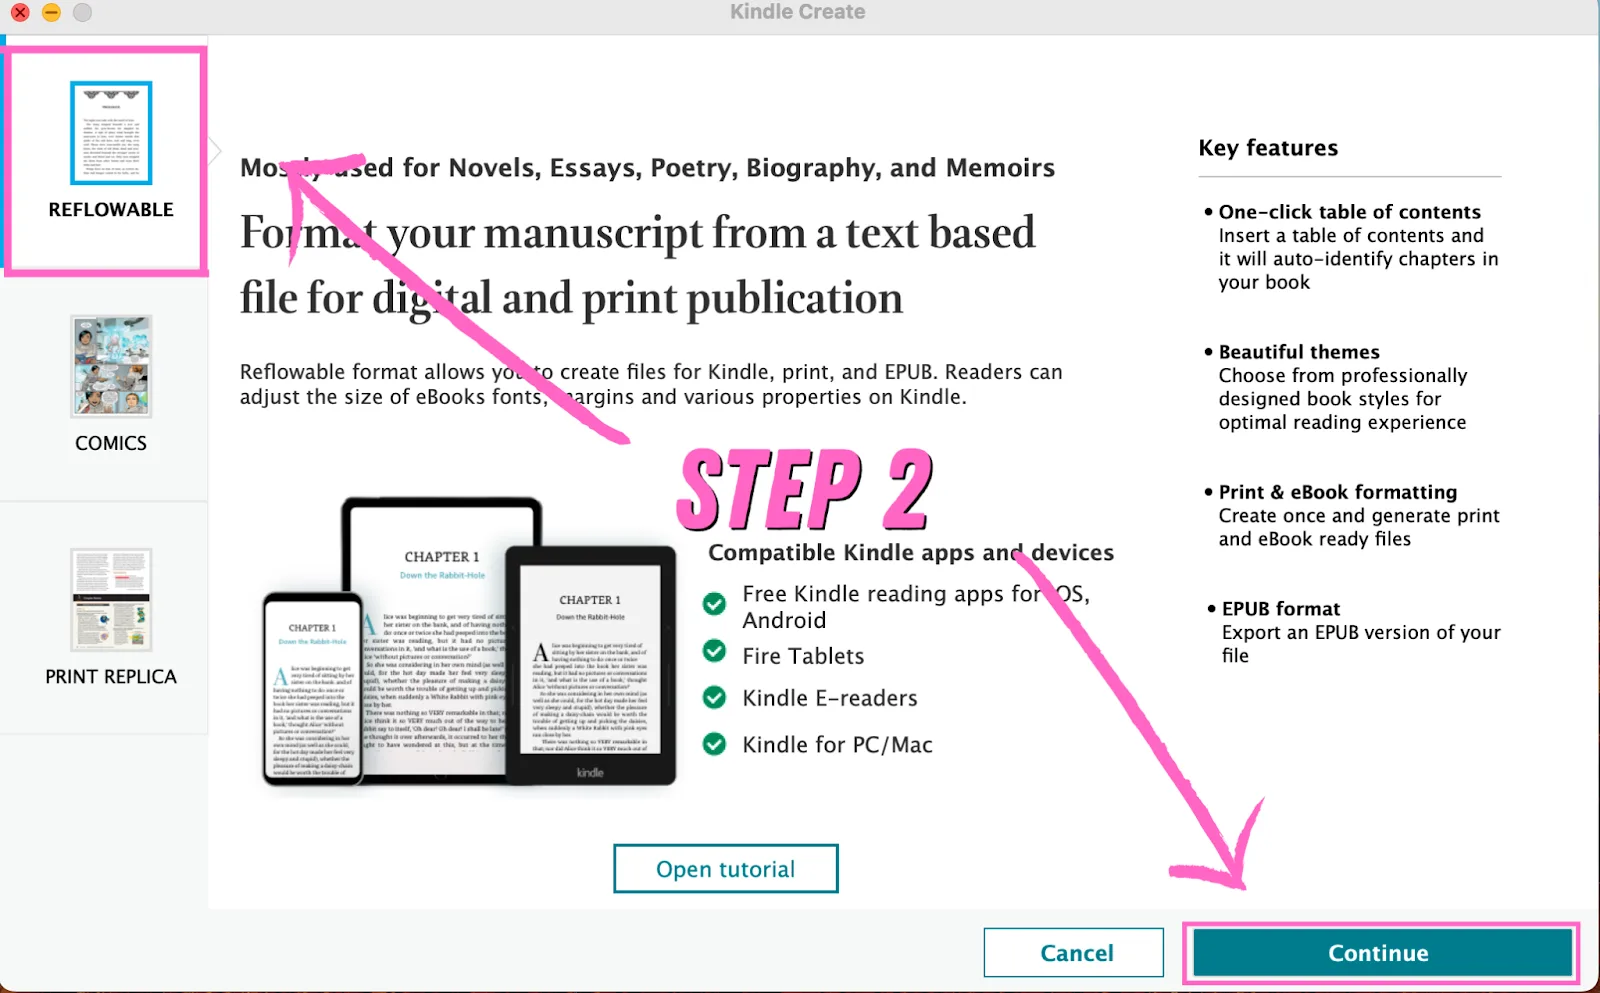
If you’re reading this blog post, you’re probably a novelist! Hello, novelist! So go ahead and select "reflowable" for a novel, then click "continue".
3. Enter Book Details
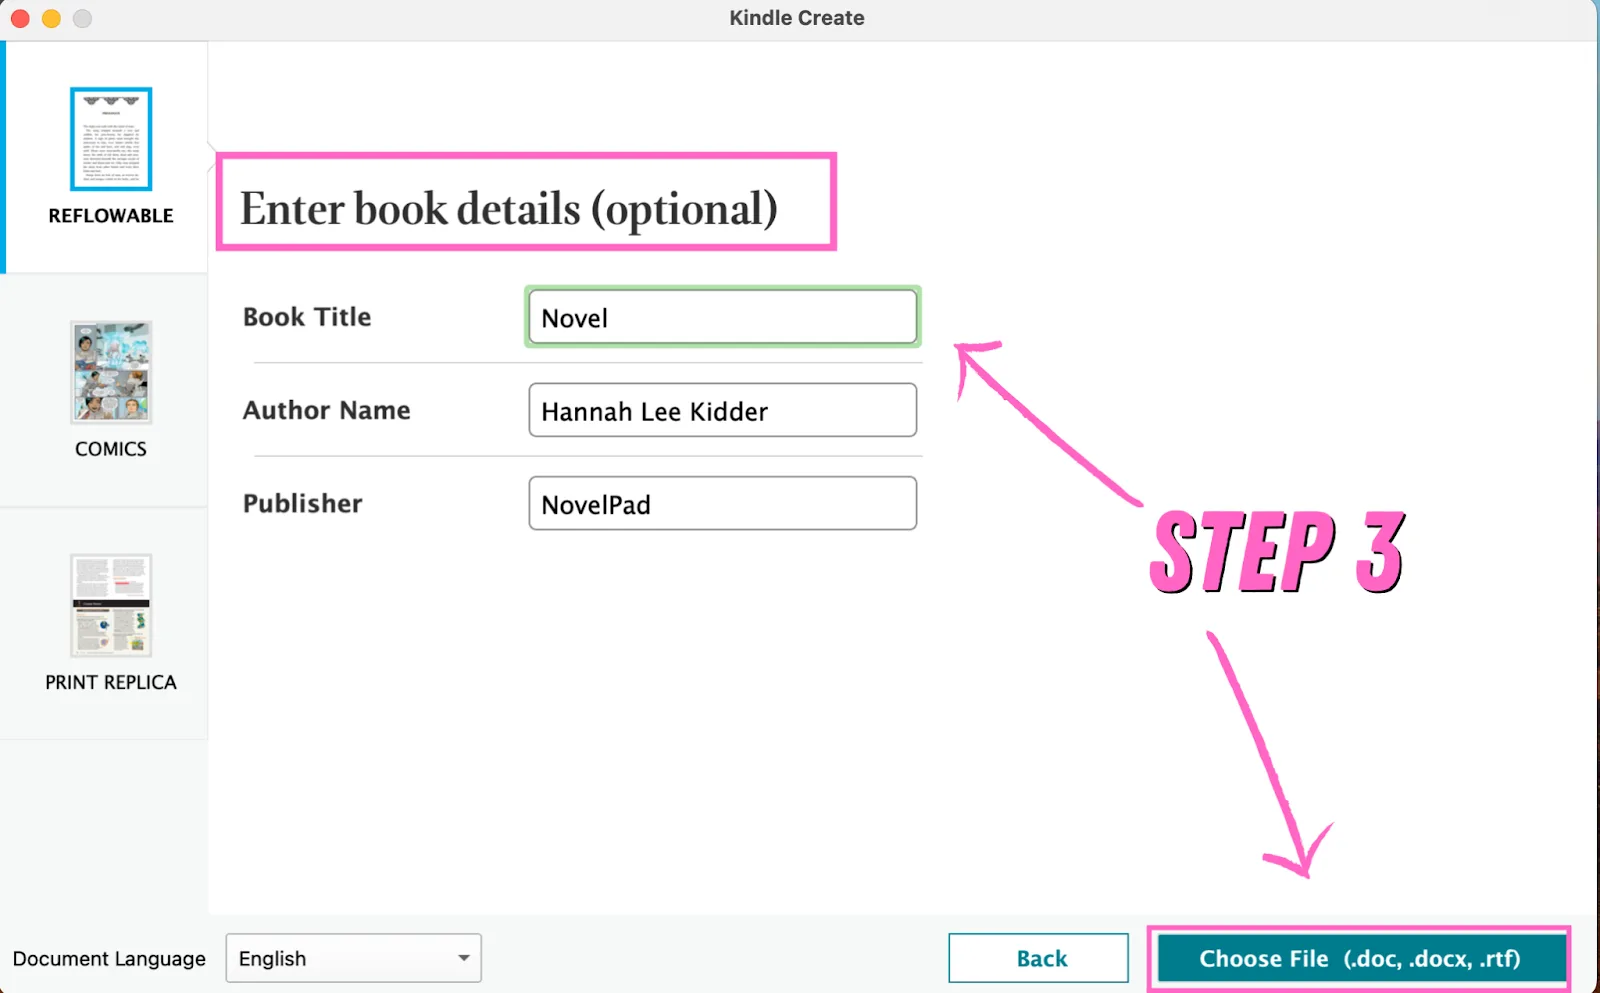
Insert your book title, author name, and publisher, then hit "Choose File" and select the project you’d like to import. You can upload a .doc, .docx, or .rft file to Kindle Create.
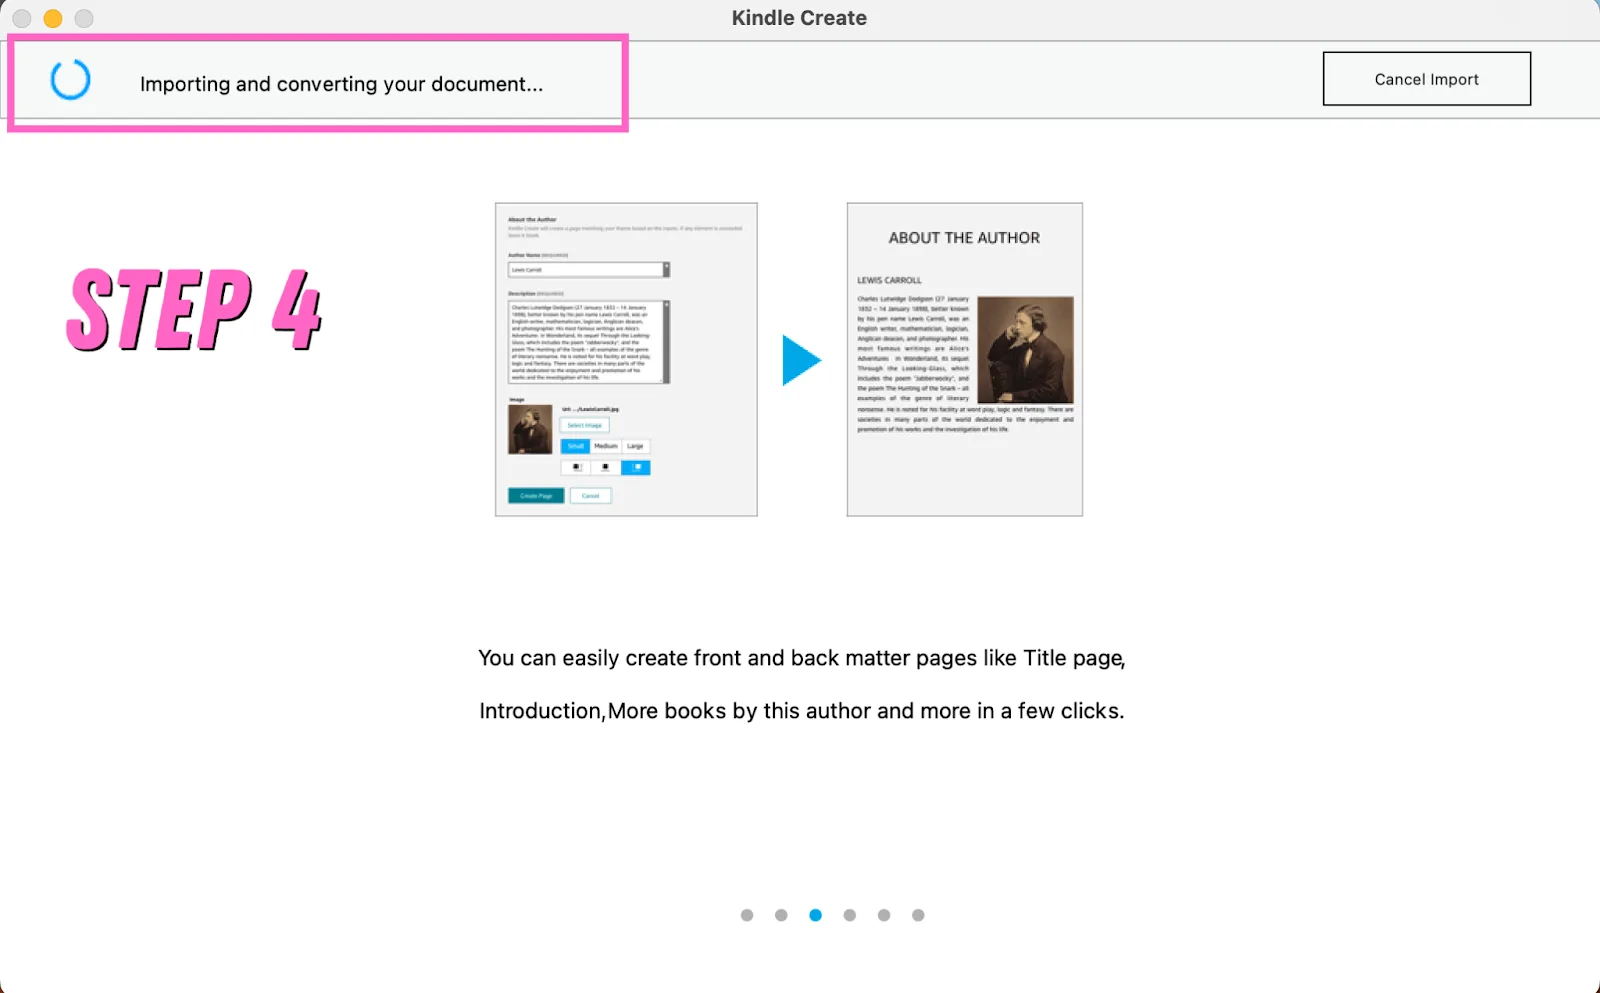
4. Import
Do a little dance while your project imports.
5. Approve Chapter Titles
If you formatted your chapter headings properly before import, you should be good to hit "accept selected" on the first pop-up.
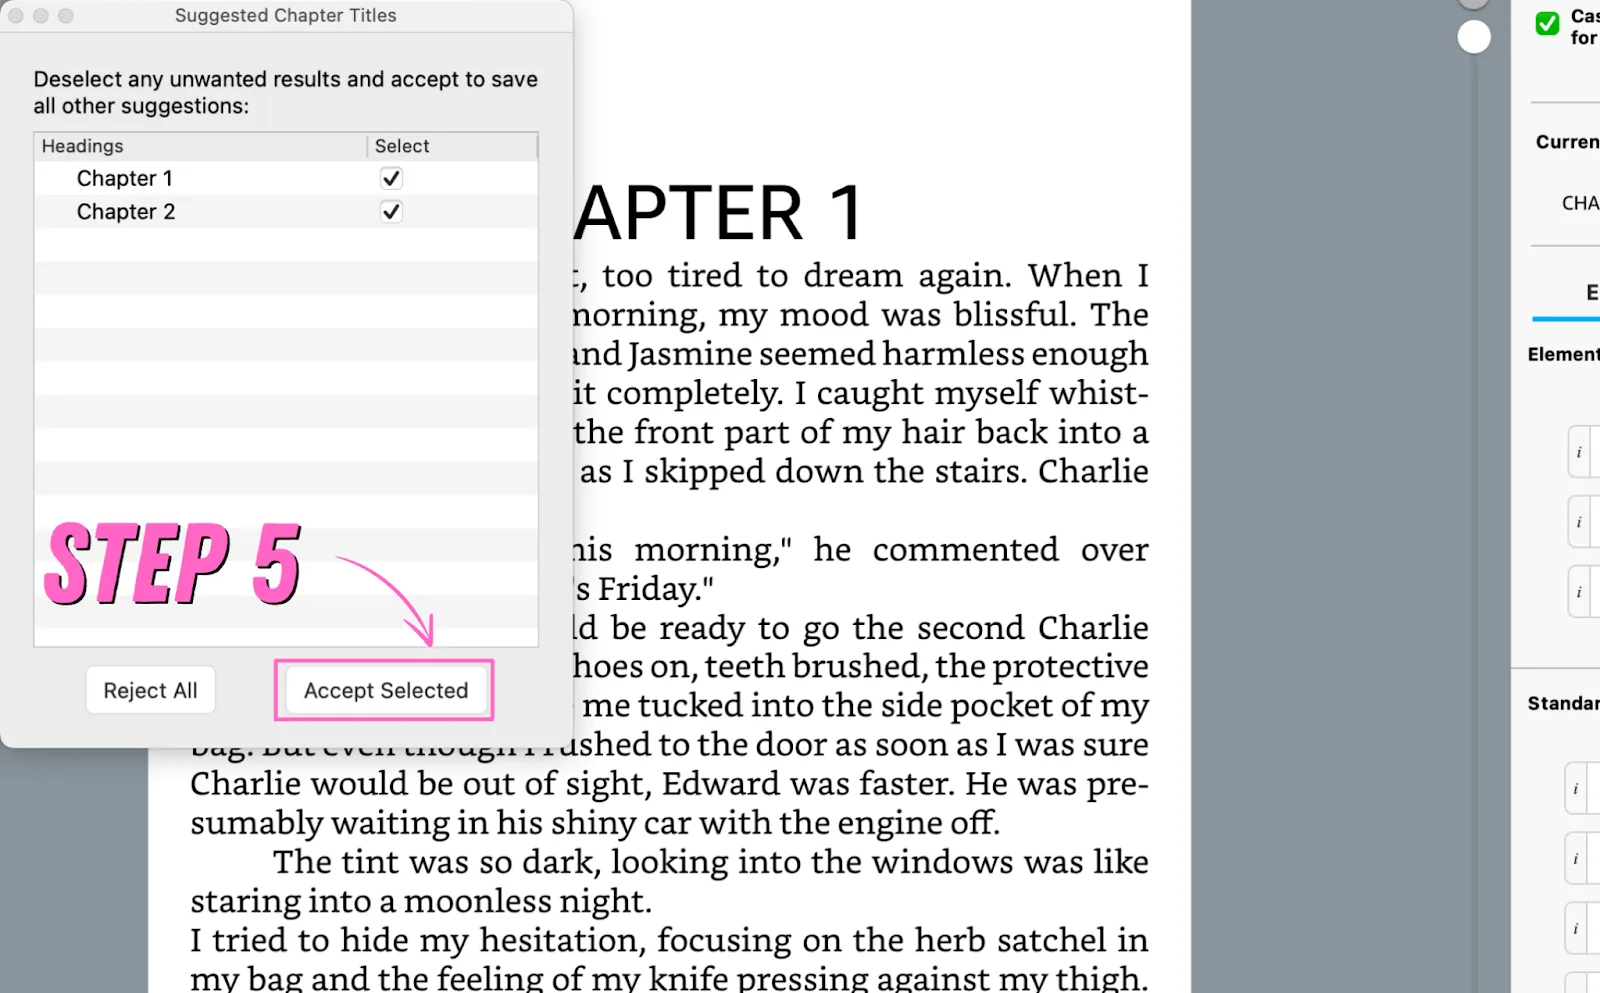
If your chapters are wonky, I suggest going back to edit those in Microsoft Word (or your word processor of choice), because doing it in Kindle Create will take ten years off your life. Simply format your chapter titles as headings and re-import.
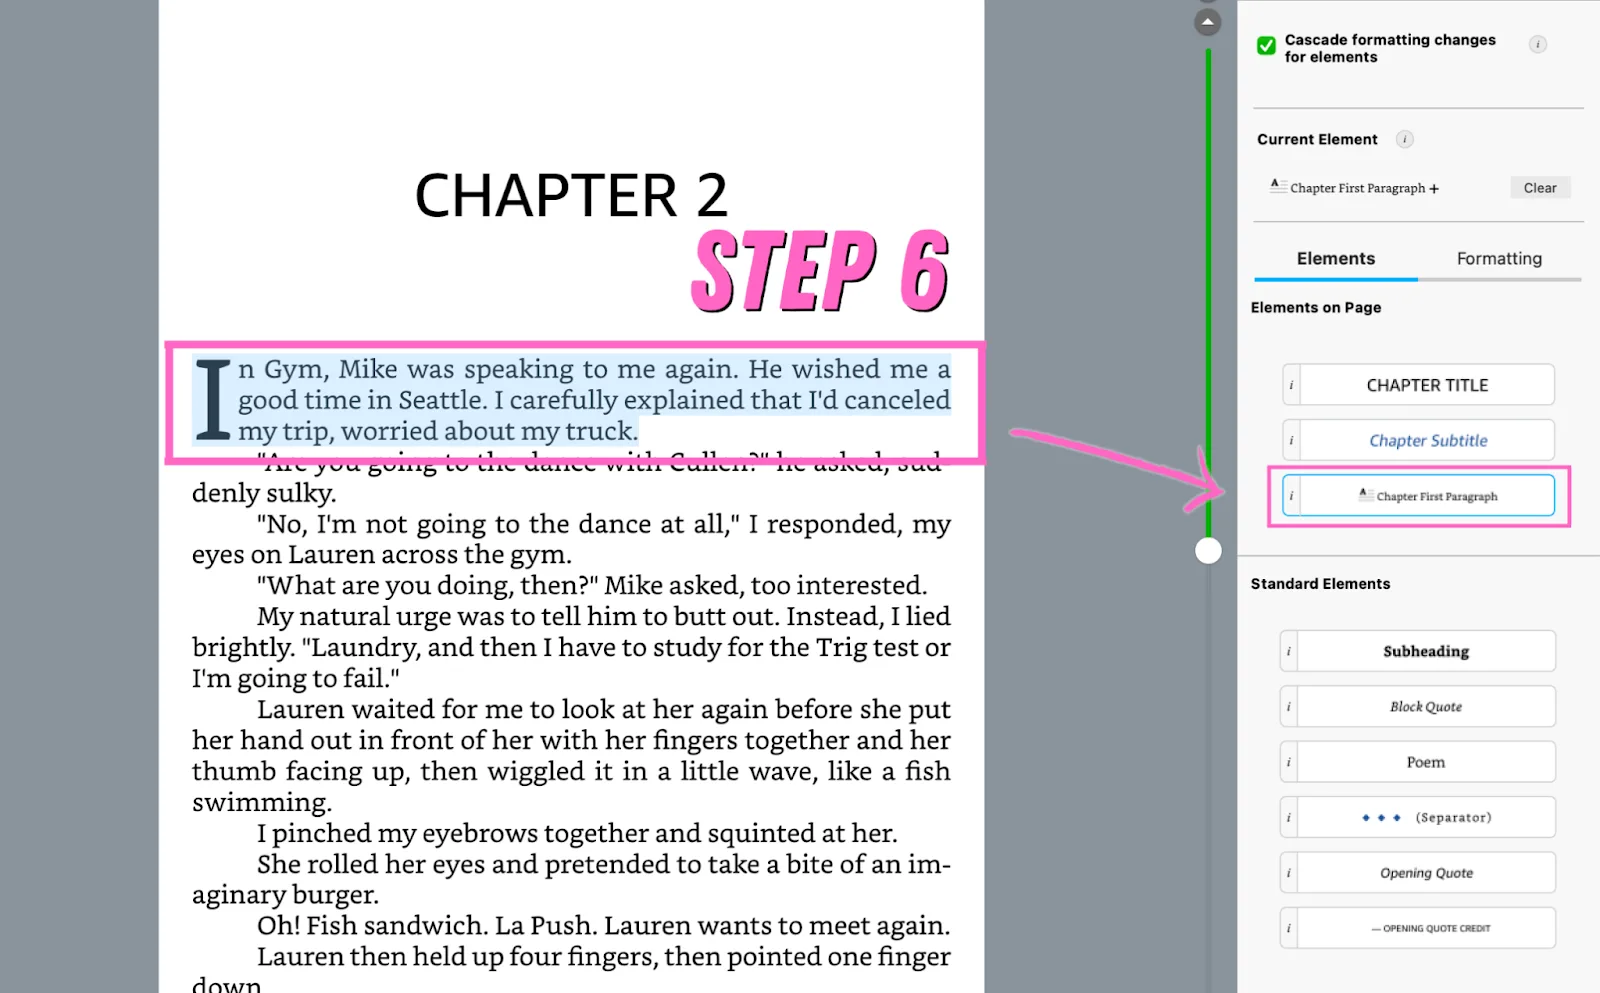
6. Assign Elements
Besides chapters, you can assign element types to the rest of your book, like subchapters, quotes, and first paragraphs. Below, I’ve attributed a first paragraph, which added a drop cap to the beginning of the first sentence.
This is optional, but it can make your ebook upload and reader experience a little smoother.
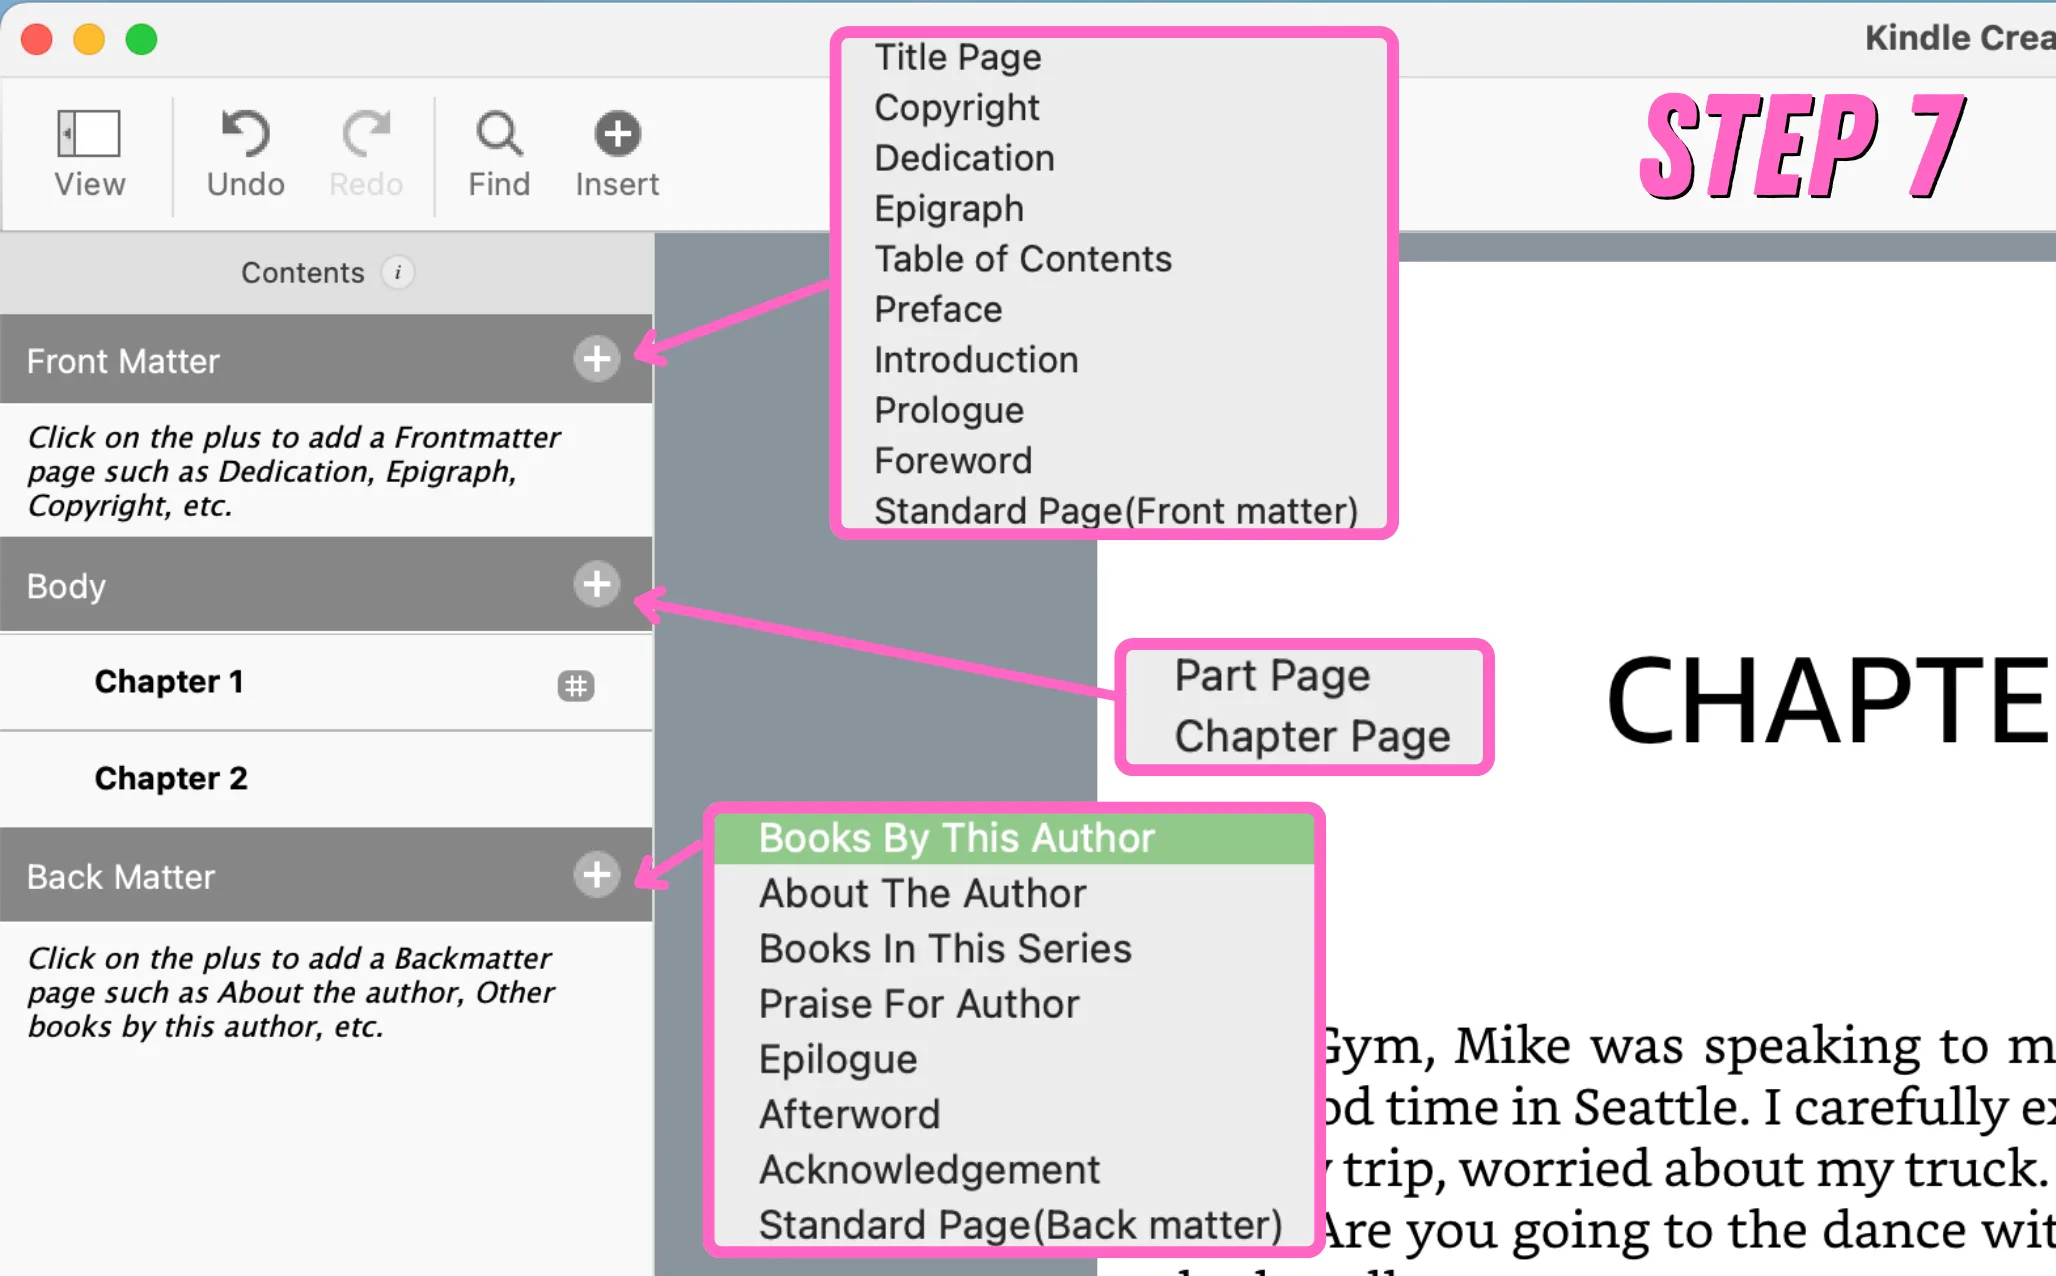
7. Add Matter
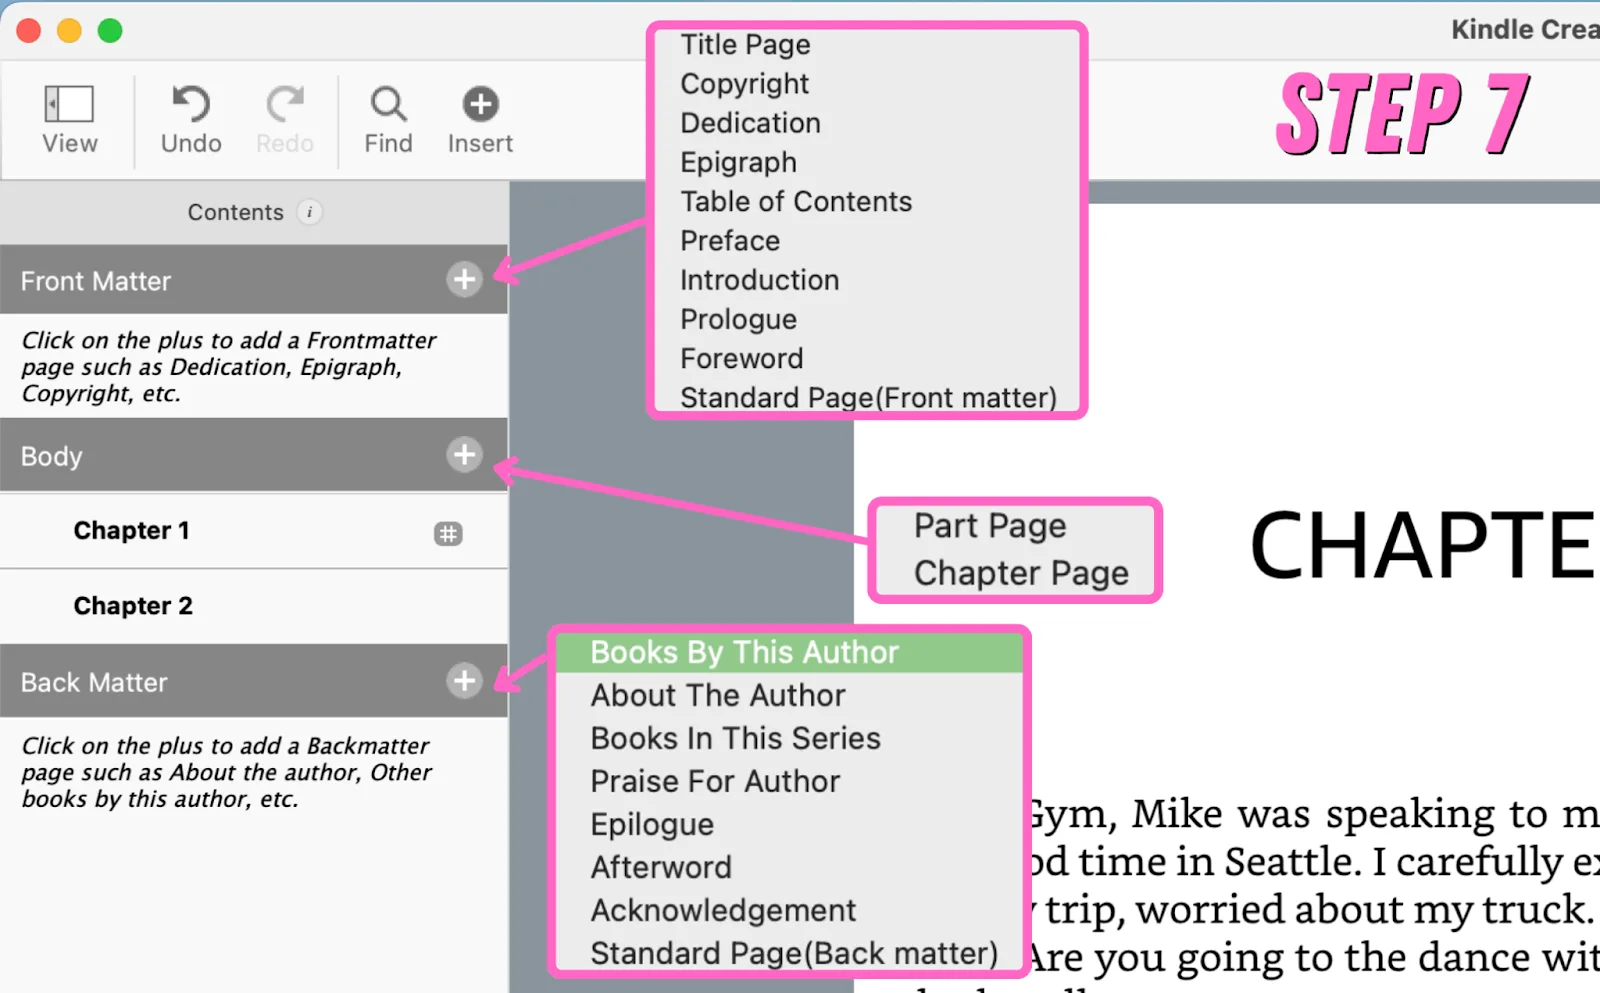
On the left side of your screen, you’ll see the Contents section. This contains three categories: front matter, body, and back matter.
Front matter includes:
- Title Page
- Copyright
- Dedication
- Epigraph
- Table of Contents
- Preface
- Introduction
- Prologue
- Foreword
- Standard Page(Front matter)
Body contains only two: Part Page and Chapter Page
And back matter offers:
- Books By This Author
- About The Author
- Books In This Series
- Praise For Author
- Epilogue
- Afterword
- Acknowledgement
- Standard Page(Back matter)
Assigning each page appropriately will let Kindle Create know what’s on that page and format it accordingly.
At this time, add and assign these elements as you so desire. Below is the page you fill out for an About The Author section.

If you use these pages, you are stuck with however Amazon decides that page is to be formatted. It does not allow further customization.
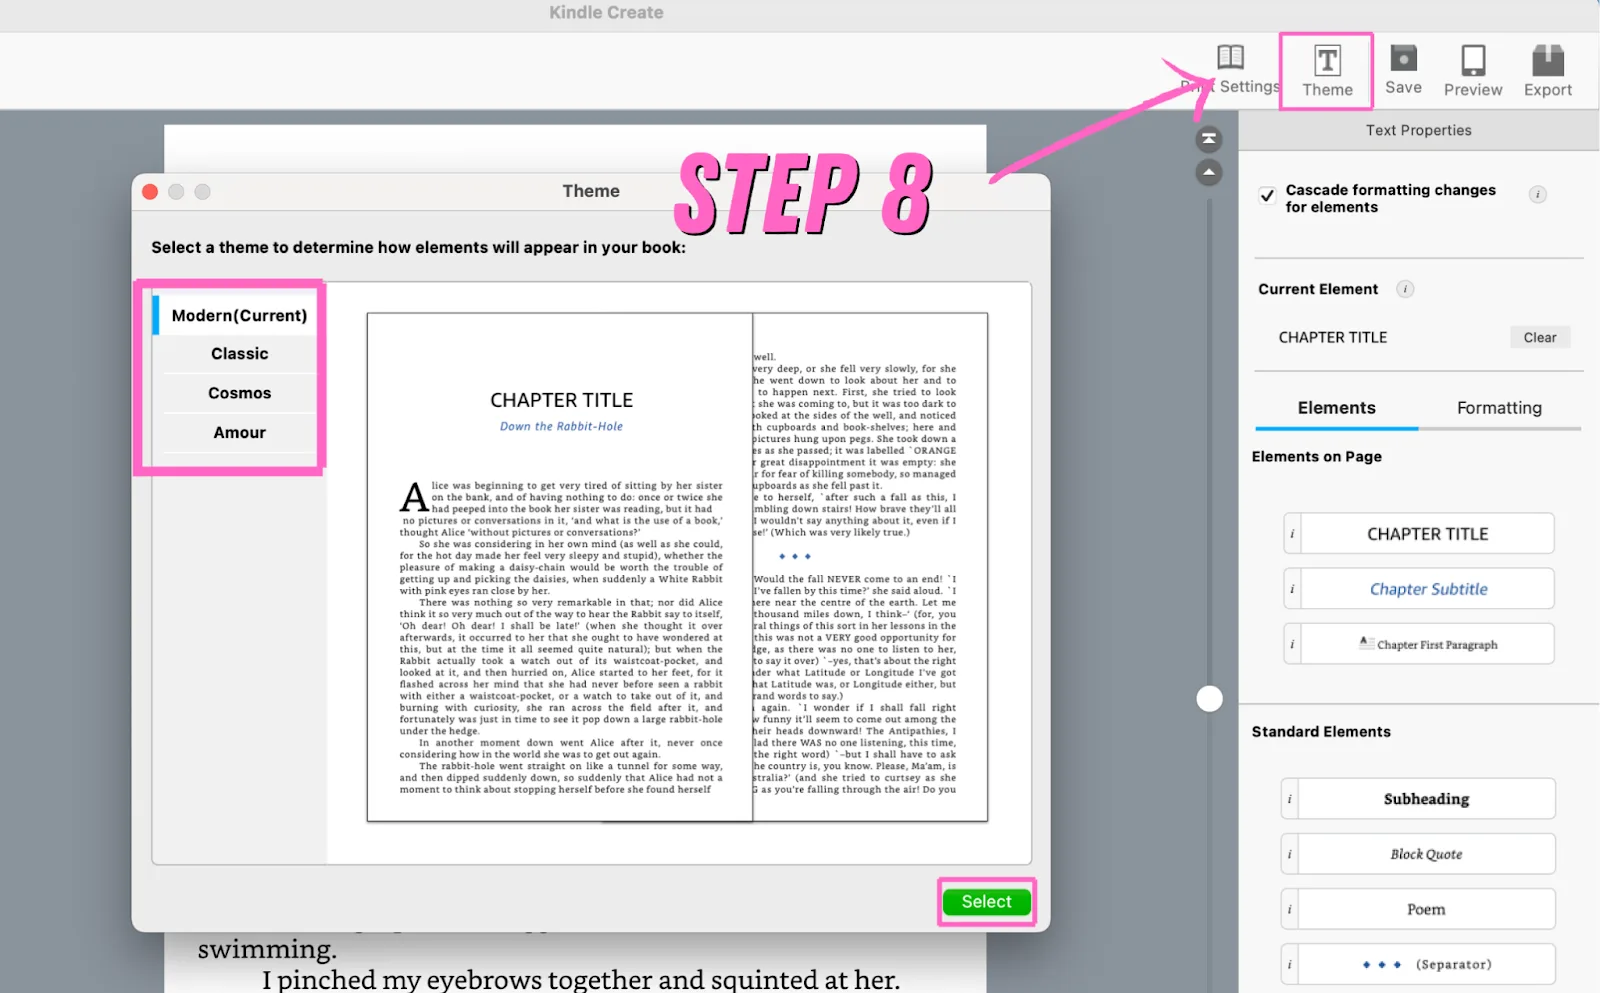
8. Choose Theme
Kindle Create offers four basic themes—Modern, Classic, Cosmos, and Amour. Choose the theme you want to use by clicking the T icon in the upper right corner of your screen, then choosing from the menu and clicking "Select".
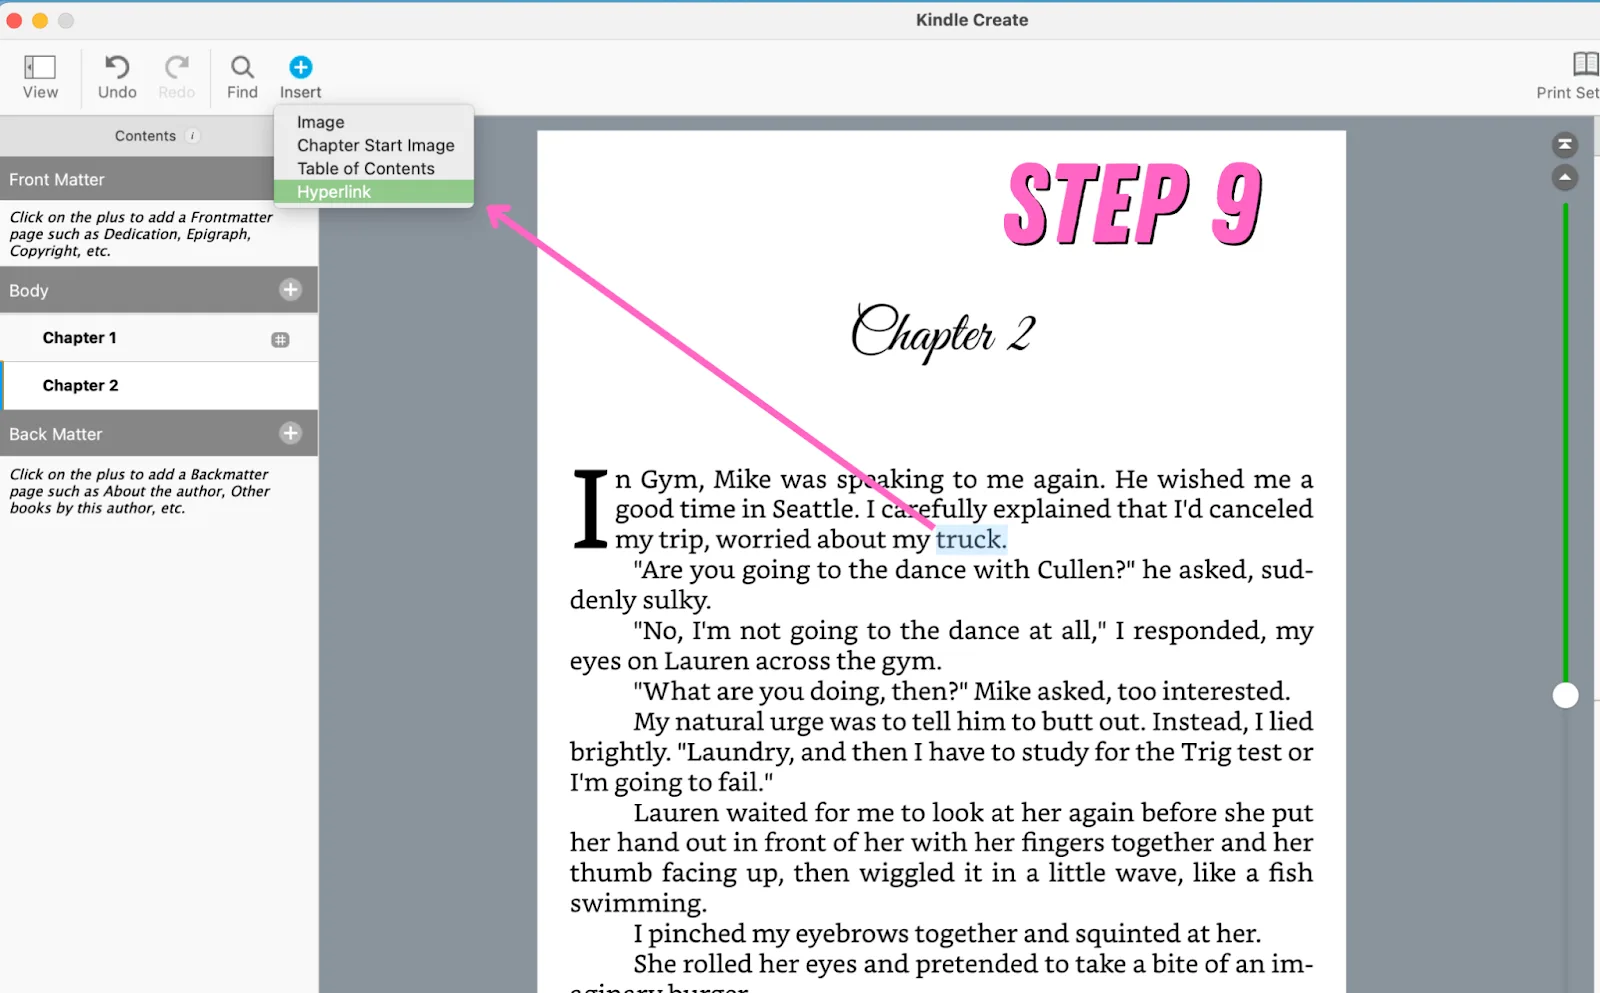
9. Insert Elements
You can insert elements like hyperlinks and images at this time.
MARKETING NOTE: You should add a hyperlink at the end of your ebook for your newsletter, socials, and/or the next book in the series.
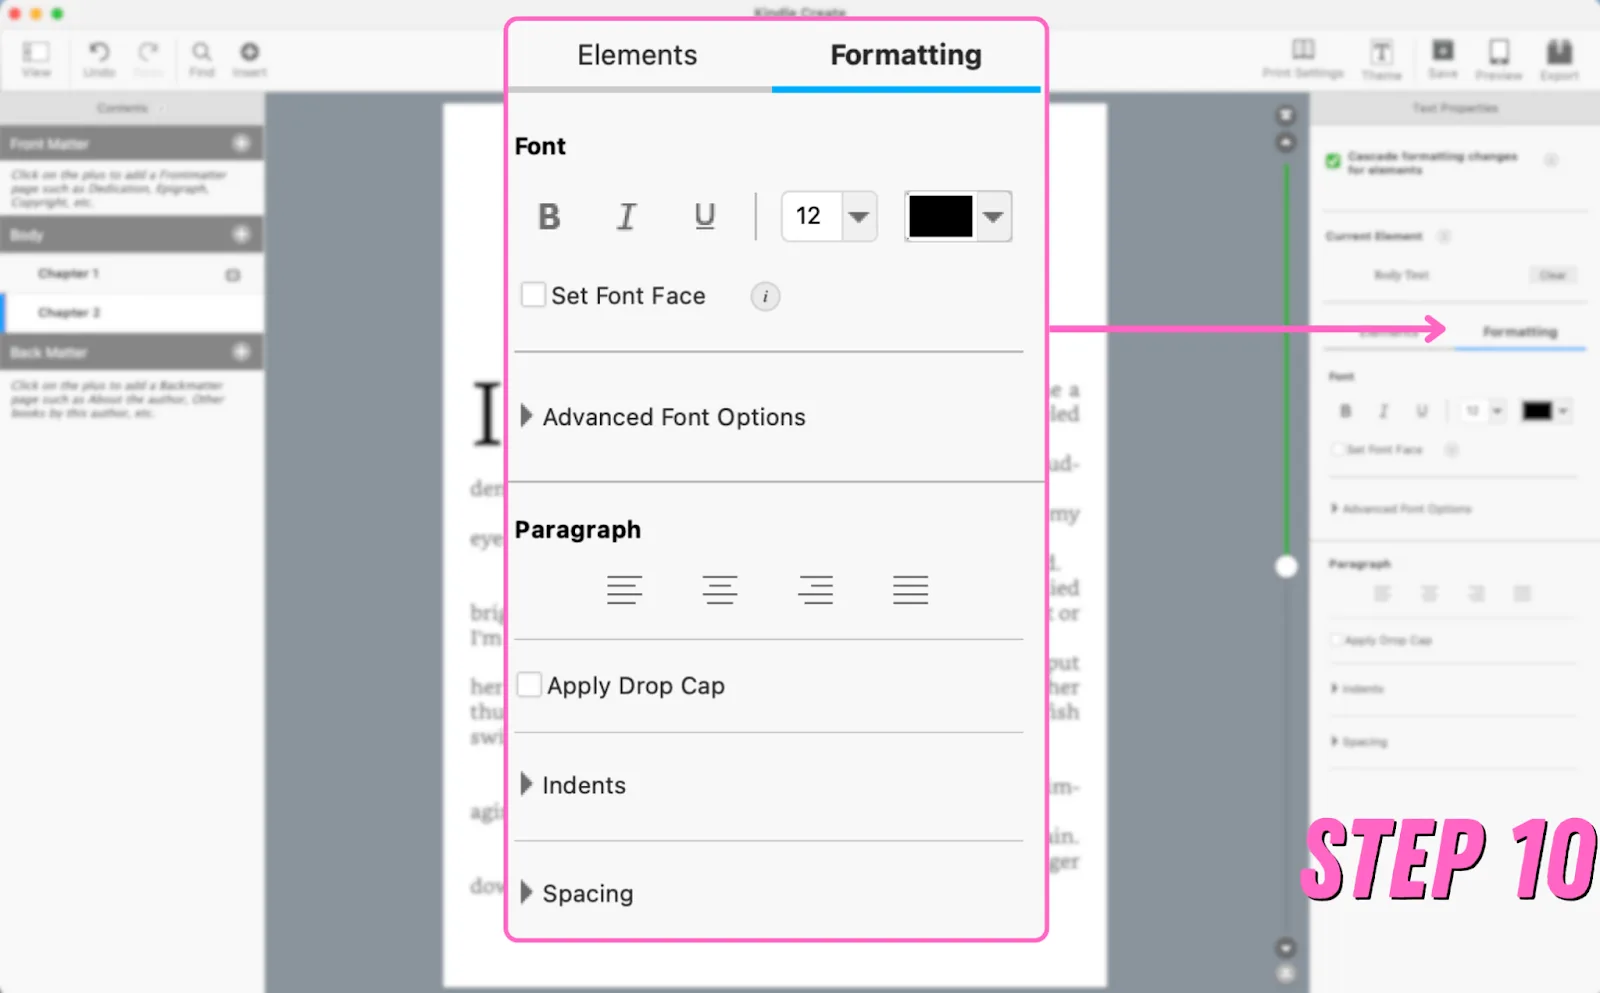
10. Formatting
While Kindle Create isn’t where you want to do your formatting, you can tweak a few things as needed. You'll find the formatting menu on the right side of your screen (this menu won't work for most matter pages).
11. Table of Contents
It makes the most sense to add your ToC as one of the last steps. If you do it at the beginning and make changes to the document, you'll have to delete the whole Table and remake it, because Kindle Create is not a formatting program.
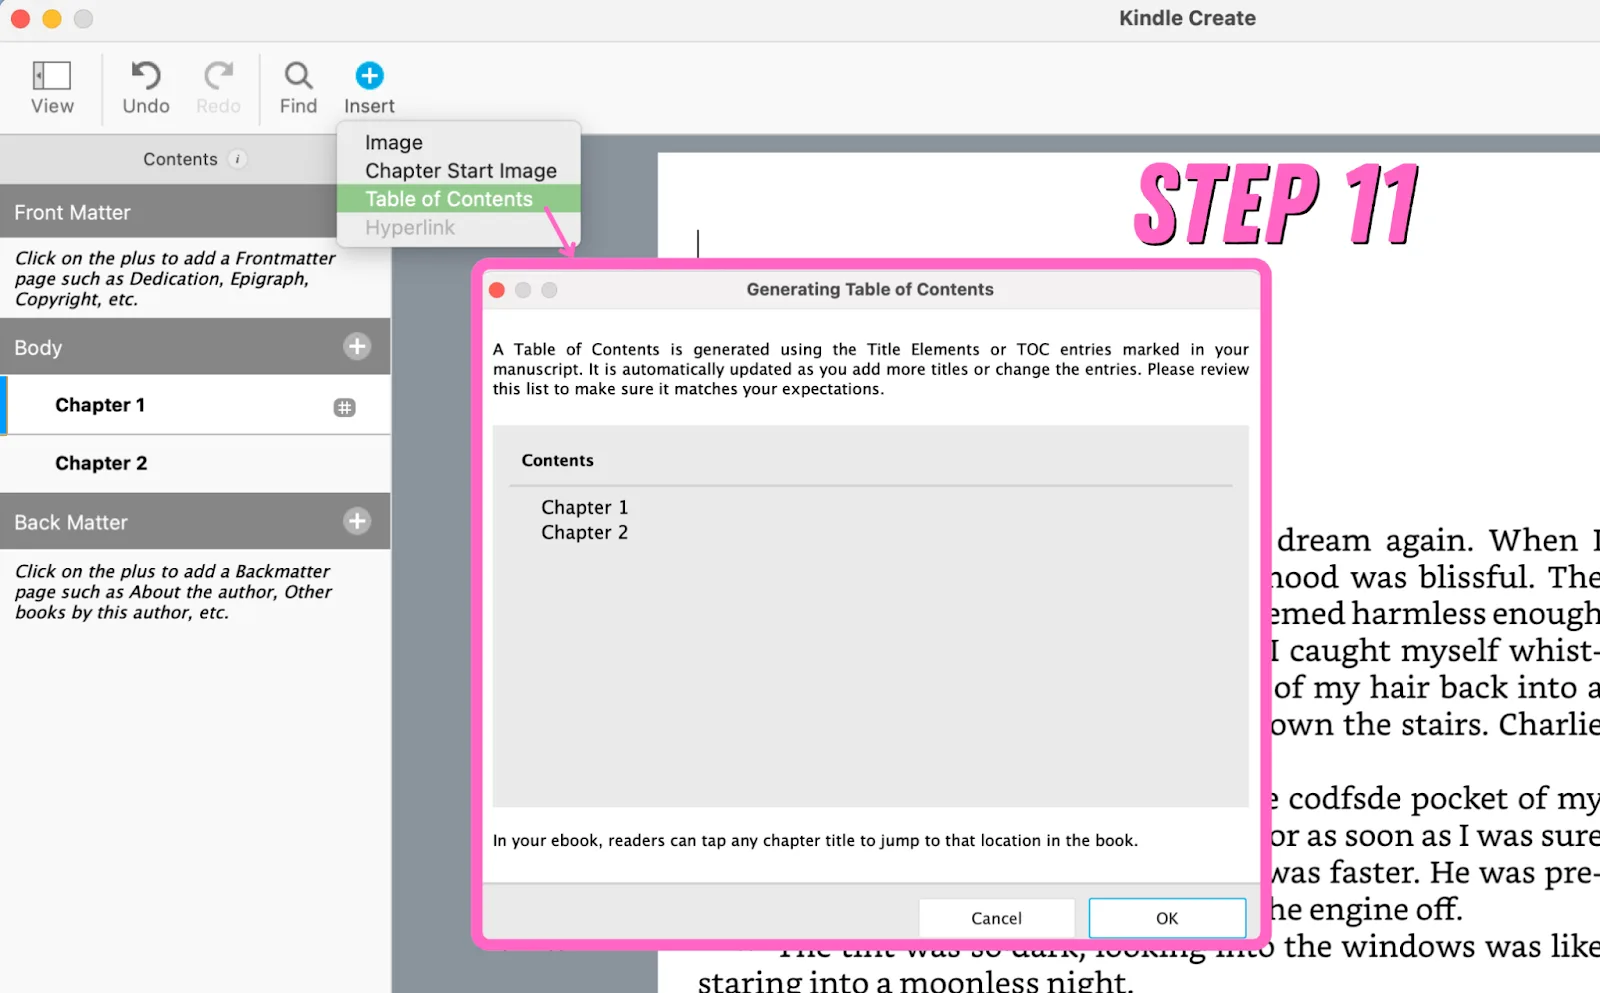
Go to the beginning of your document and hit the plus sign in the left upper side of your screen labeled "Insert," then hit "Table of Contents". A pop-up will let you preview what will be included, and if all looks well, hit "OK" to add your table.
12. Preview Your Project
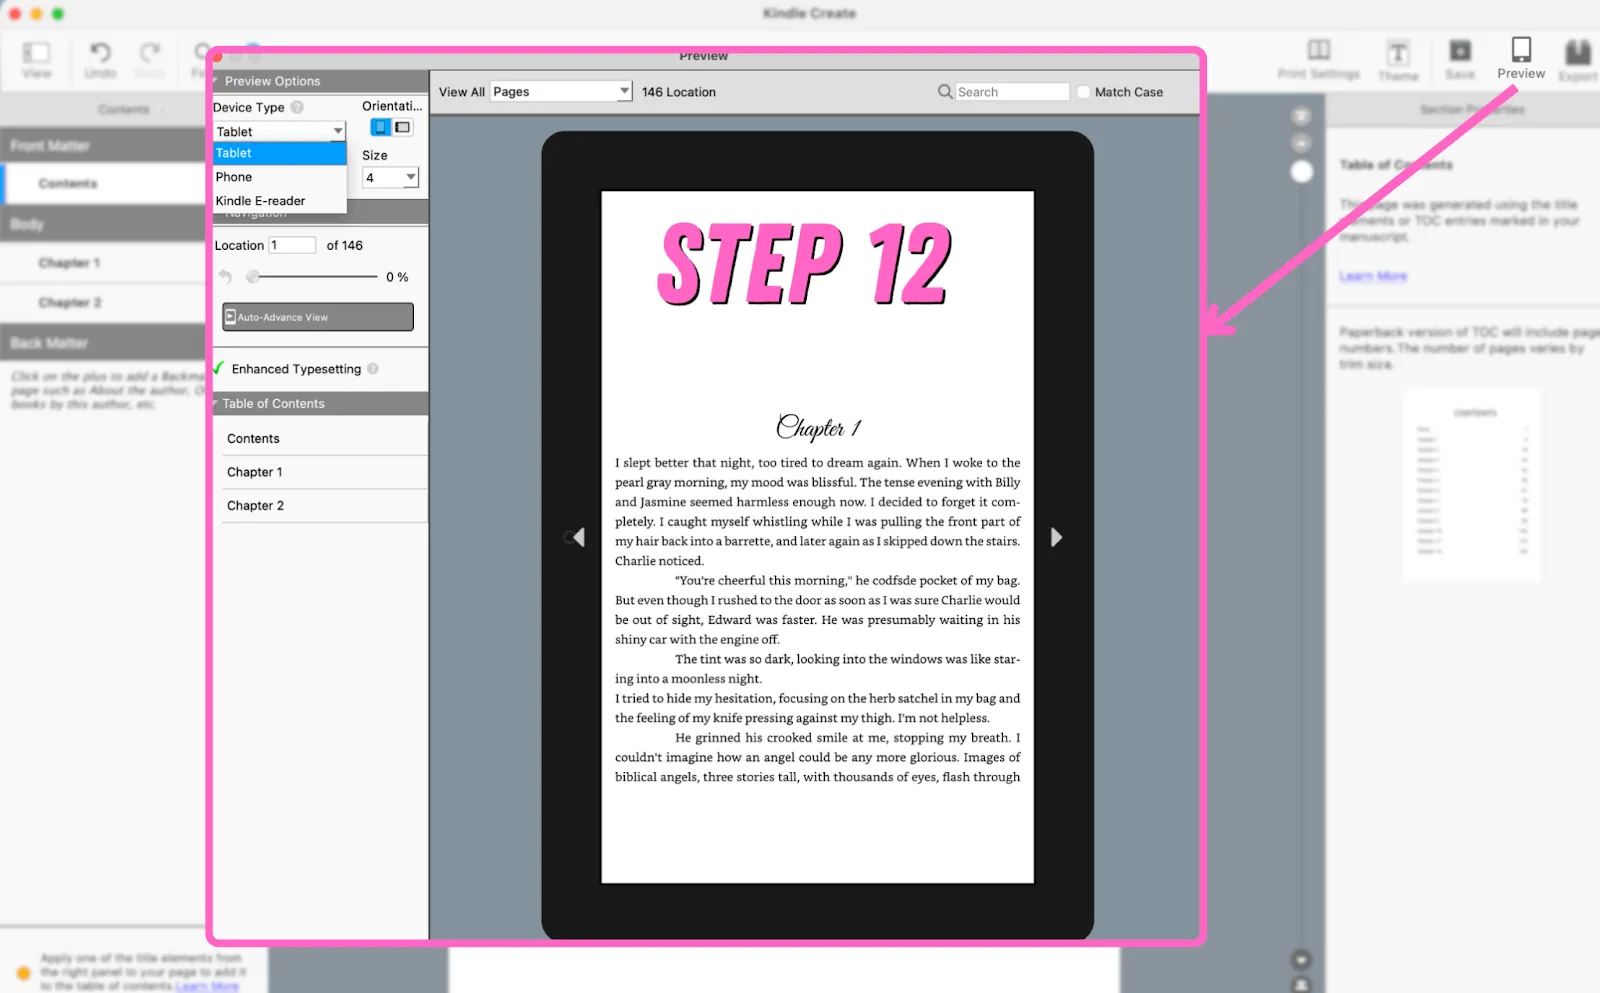
Everything should be completed, so let’s preview our project and make sure we haven’t missed anything. Hit "Preview" in the upper right corner of your screen. You have the option of viewing your ebook as it might look on a tablet, phone, or e-reader.
13. Export
If all is well, it’s time to create your book. Hit "export" at the top right of your screen and select the desired formats. Your options are—drumroll—KPF or EPUB. Select the ones you want and click "export". Tada, you have a book you can now upload to KDP and hopefully make some sweet sweet dollars.

What Format Does Kindle Create Use?
Kindle Create allows users to upload projects as a .DOC, .DOCX, or .RTF. Users can export their book as a KPF (Kindle Package Format) or EPUB.
You can also upload a PDF to format for digital publication.
How Much Does Kindle Create Cost?
Kindle Create is free to use for Amazon account holders.
Can I Import a PDF To Kindle Create?
Yes, you can import a PDF to Kindle Create by selecting PRINT REPLICA on the new project prompt.

Should I Use Kindle Create?
Sure, but I recommend using it as little as humanly possible. If you want to publish your book as a KPF on Amazon's book platform, you can use Kindle Create to ensure that your file converts beautifully. Note that your KPF can only be used on Kindle Direct Publishing. If you want to publish on other platforms, you will need different file formats.
Formatting within Kindle Create is an exercise of self-flagellation. The interface is laughably bad, it’s needlessly difficult to navigate, and you’ll end up frustrated and annoyed just from using it as a file converter, much less trying to format with it.
I recommend doing your formatting elsewhere, then using Kindle Create as your last step, specifically if you want your book as a KPF.
Kindle Create Download
Download Kindle Create here. You’ll need an Amazon account.
Can I Format a Book With Kindle Create?
You can sort of format a book with Kindle Create. Your book should already be formatted. Kindle Create is a fancy file converter to turn your book into a Kindle-only file.
Kindle Create Alternatives
I'm not going to tell you Kindle Create sucks, then leave you hanging. Here are some alternatives.
Use Different File Formats
KPFs aren't required for ebook uploads to KDP. There are many accepted file types, which means you can skip over Kindle Create entirely.
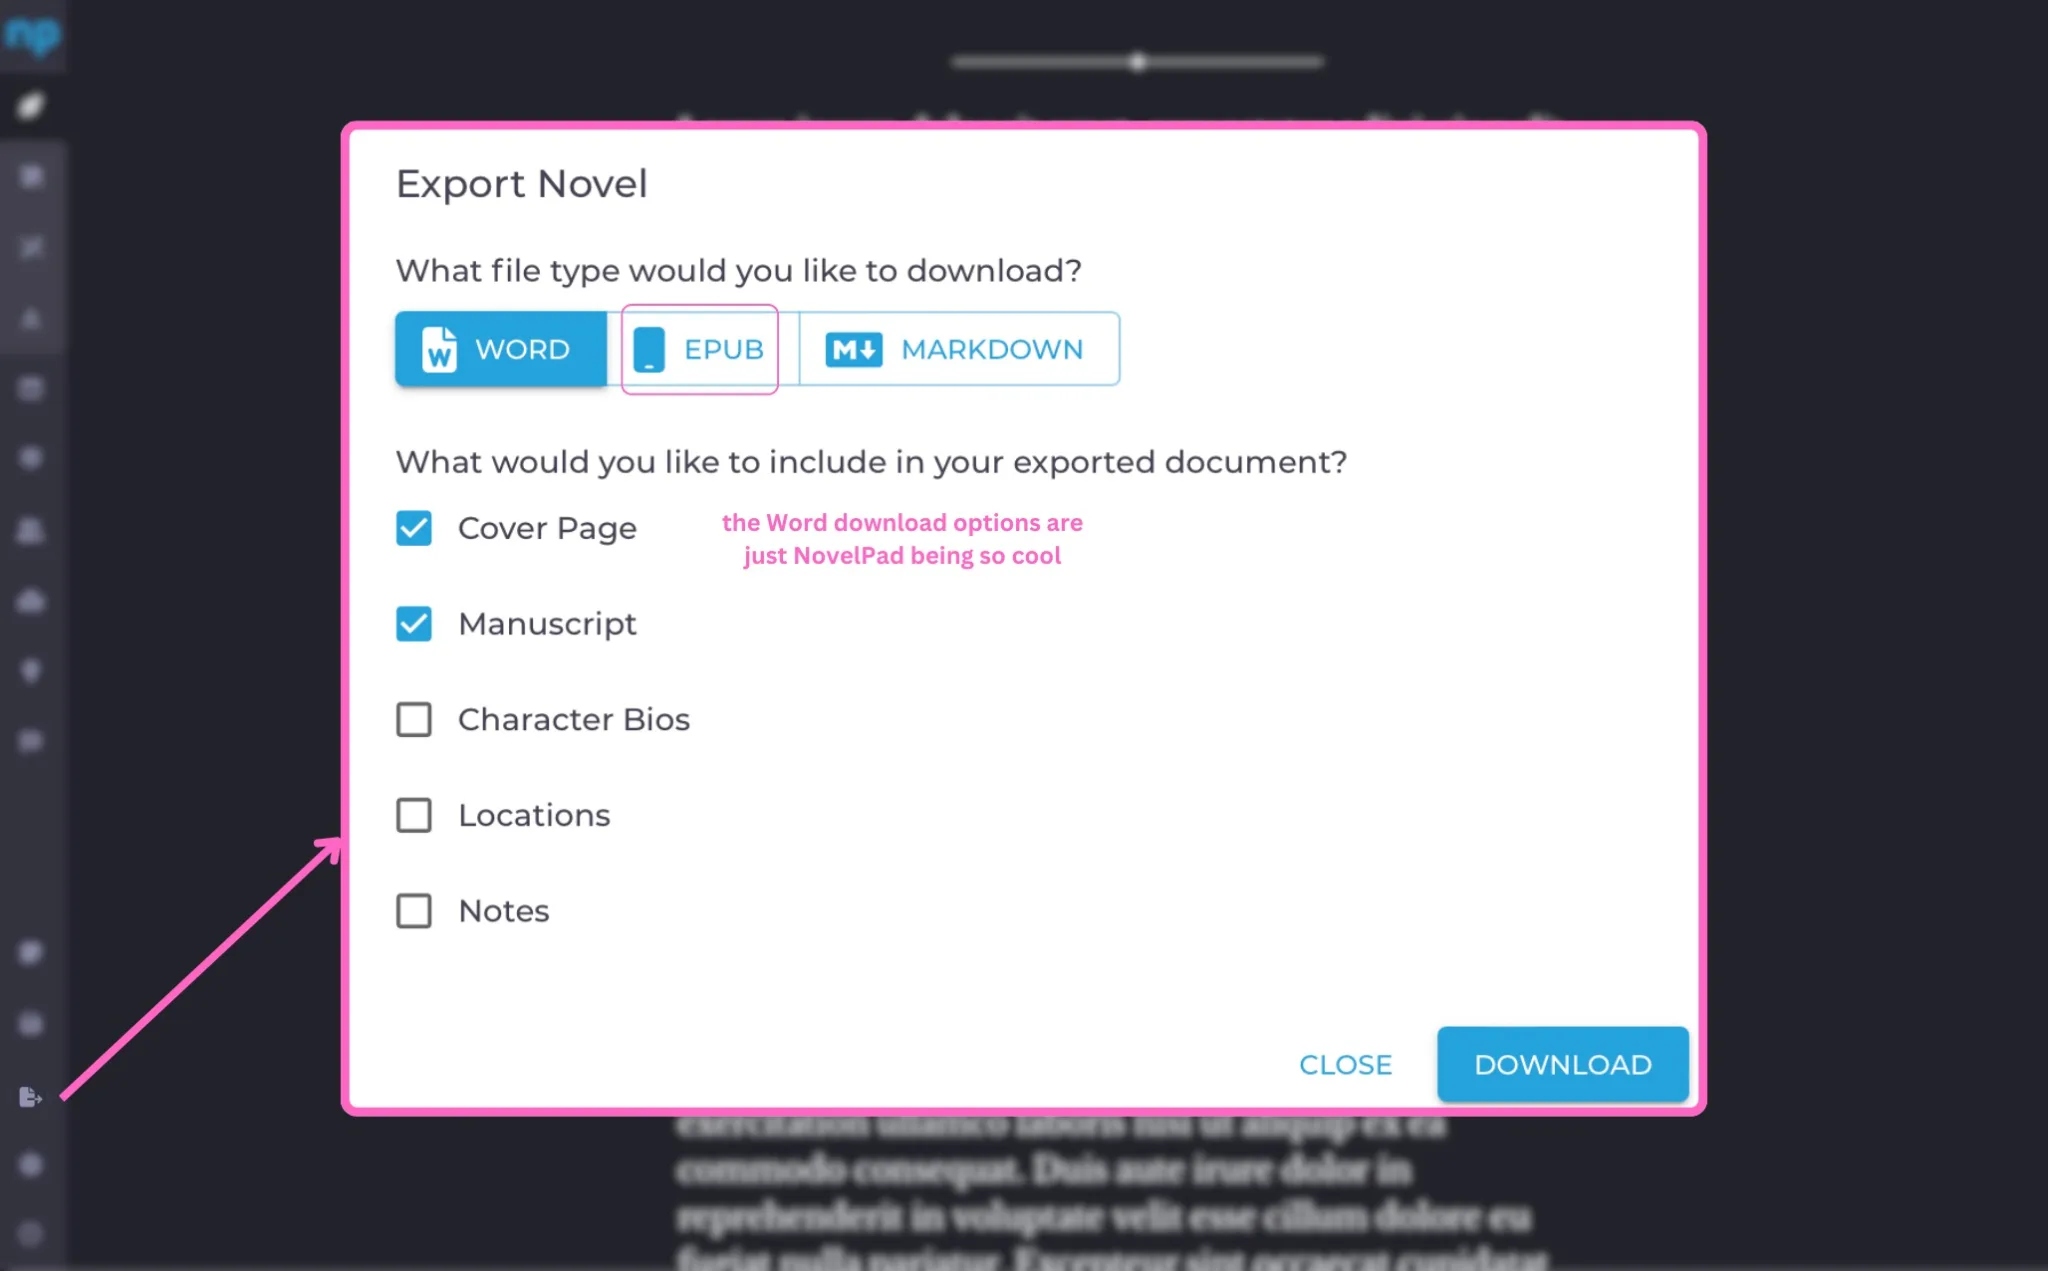
Most word processors and novel writing software allow you to export as PDF, EPUB, and other acceptable formats. For example, here are NovelPad's export options:
PS, you can try NovelPad for free, no credit card required.
Create KPFs With Kindle Previewer
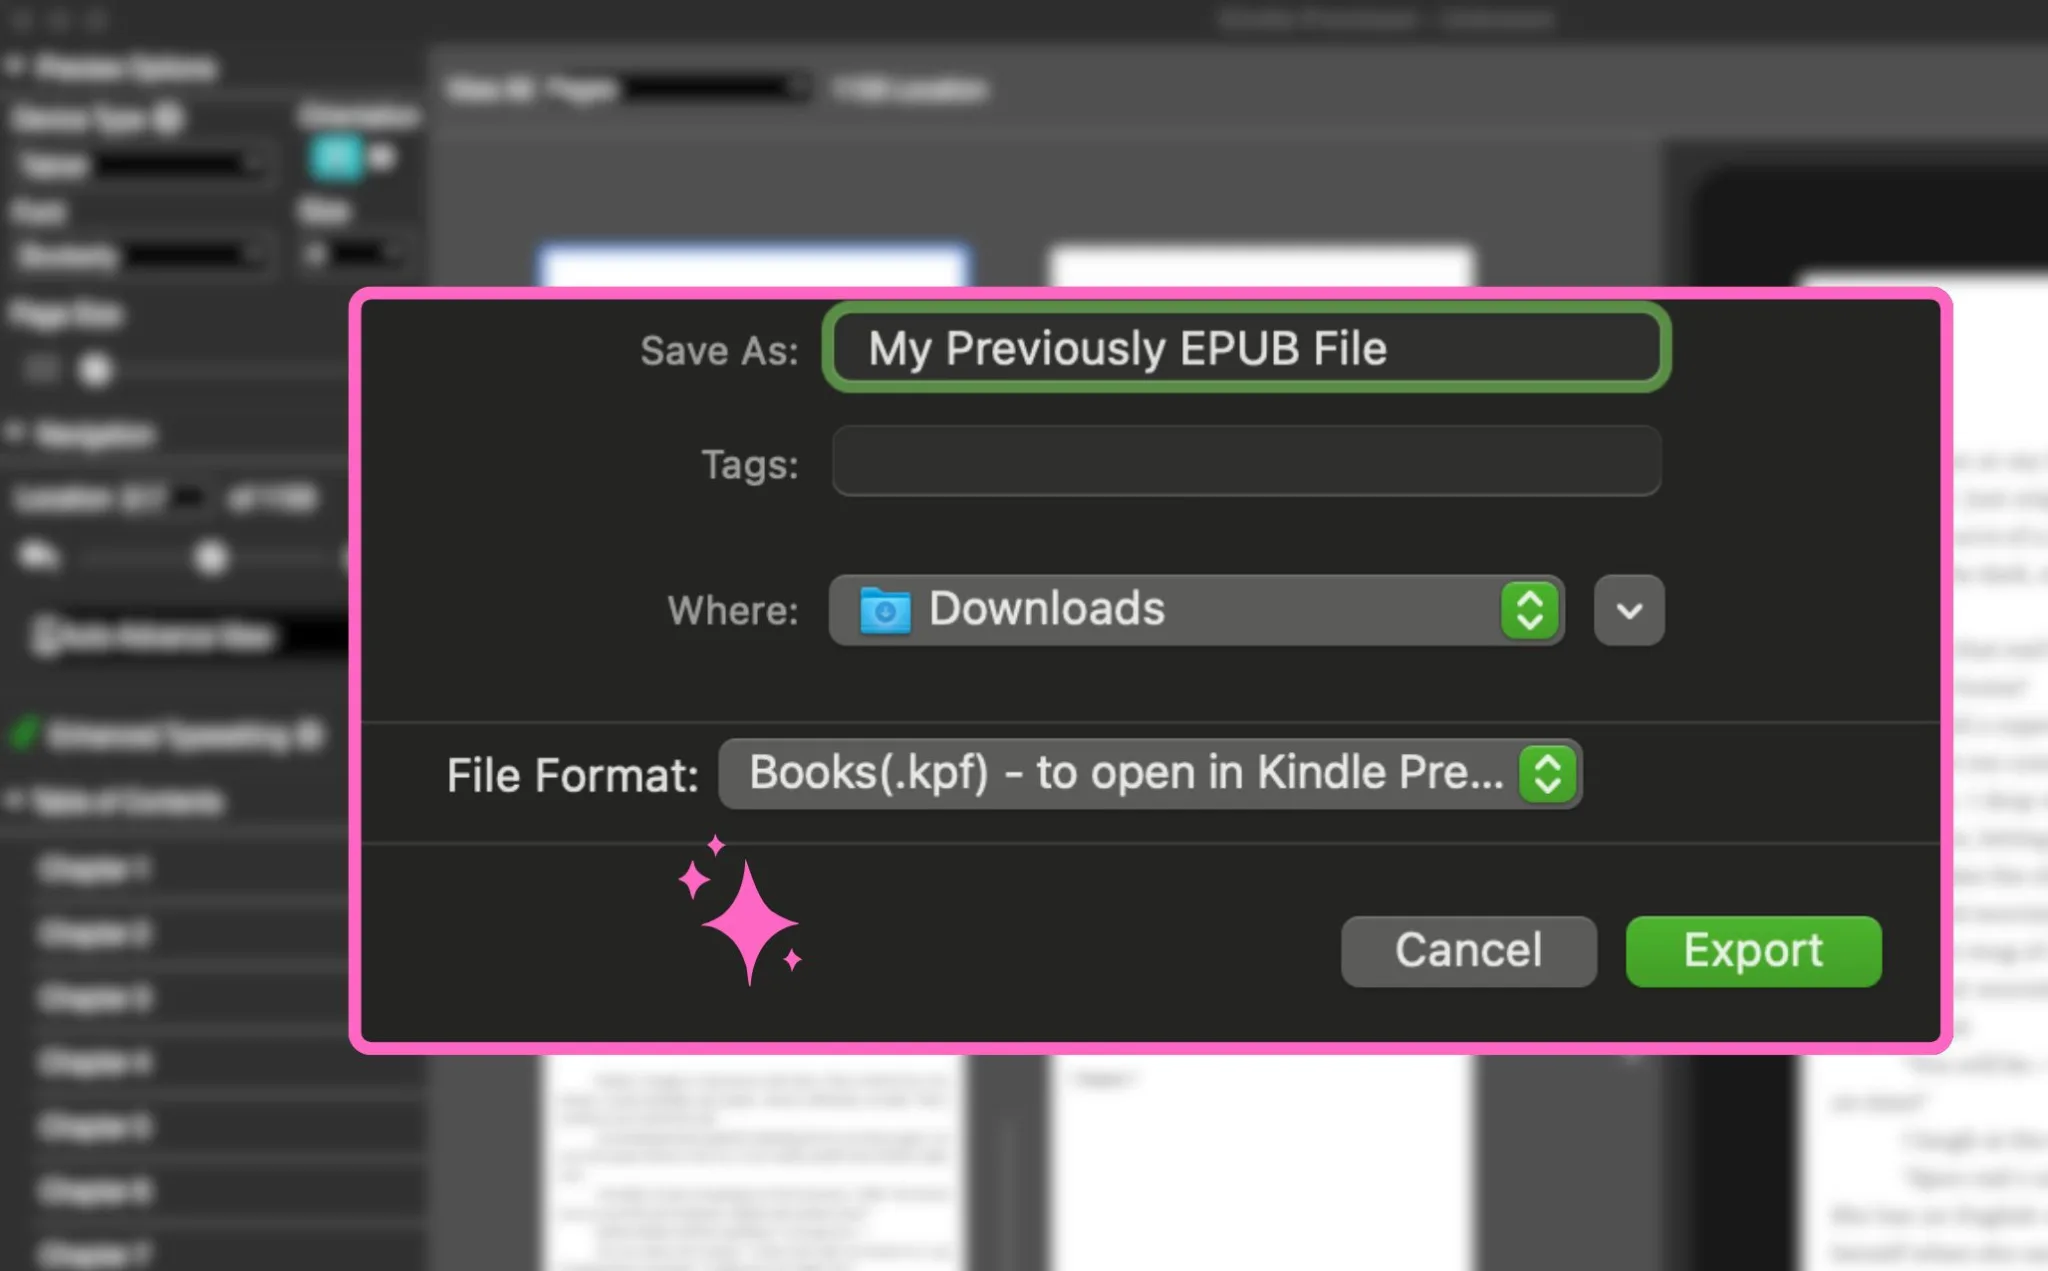
If you have your little heart set on a KPF, I got you. Simply export your manuscript as an EPUB from your program of choice, run it through an EPUB validator to make sure everything is shipshape, then drop your EPUB into the Kindle Previewer. It will automatically convert your file for you, then you can export it as a KPF.
All you need to know about Kindle Create is that it is a program designed to punish authors, and it's fantastic at doing that.