How to use
NovelPad

Welcome to NovelPad! We're so glad you're here. We strive to create a writing software that is as intuitive as possible. Here we'll walk you through a few tips to get started with writing your novel.

First things first: Create a new Novel.
To start writing, you'll need to con the Bookshelf. Each novel is its own separate space for all of the scenes and information for your story, and maintains its own settings (such as font, margin, and editing choices). You can create as many novels as you want and can also archive novels when you no longer want to work on them.

Pick your writing preferences.
The Settings screen lets you set up the aesthetics of your writing, including the spacing, font, text alignment, and margins. This screen is also where you can choose light mode or dark mode and whether you want editing checks for spelling, grammar, and style enabled or disabled. At any time, you can also go to the Settings screen to get a quick onboarding tutorial.

Start writing!
That's it! Now head over to the Manuscript to start writing! As you get into writing, take a moment to learn about scene cards and how to add new chapters and scenes to your growing novel.

Manuscript

Scene cards

Create a chapter

Create a scene card
Set up a goal and keep on writing!
Now that you're into the swing of things, set up a writing goal to help you stay on track and keep on writing!

Get more familiar with each of the boards.
Once you're set up and chugging along, take a little tour around NovelPad and get familiar with each of the boards. The boards all allow you to create and organize different aspects of your novel, which can come in handy as you continue writing and developing your story.

The Bookshelf

The Bookshelf is the main dashboard for all of your novels as well as the main page for your NovelPad account. From this page, you can create a new novel, delete or archive an existing novel, manage your account, or log out of NovelPad.

The Bookshelf displays automatically when you access NovelPad. To get to the Bookshelf when you're in a novel, click the NovelPad logo in the top left corner.

Create a New Novel
To create a new novel, click the large Add Novel tile at the end of your list of novels. Your new novel will be added, and you'll be taken to the Manuscript of your new novel, where you can change the title of the novel and the author name.

For help getting started with writing your new novel, check out the Get started with NovelPad topic.
Clone an Existing Novel
You can clone an existing novel to create a new novel that is a copy of the existing novel. This might come in handy if you want to start a new version of the novel while maintaining the old version. For example, you can clone a novel to create a second draft of that novel while preserving a copy of your original first draft.

To clone a novel, hover your cursor over the novel to display the options for the novel. Then click the Clone icon  . A confirmation dialog will appear. Click Yes. Clone my novel. to clone your novel. A new copy of the novel will appear on the Bookshelf, noted with a tag of (copy).
Rewind a Novel
With the Rewind feature, you can access any saved version of your novel from any point in the novel's history. Our backup system saves a copy of your novel every 30 seconds, and the Rewind feature lets you jump backward or forward between any save point, allowing you to write fearlessly.

For example, let's say you left your laptop open to the scene you were writing while you went to the kitchen and prepared yourself a tasty snack. In the meantime, your cat decided to walk in small circles on top of your keyboard before settling down into a catloaf, inadvertently (or maybe purposely--cats are mean like that) overwriting not only the scene but a large portion of your content.

Have no fear. Simply shoo your cat off your keyboard, access your novel on the Bookshelf, and rewind the novel to the moment before you got up to make your ants on a log.

To access the Rewind feature, hover your cursor over the novel to display the options for the novel. Then click the Rewind icon . On the Rewind dialog, select the date and time that you want to rewind your novel to. Then click OK.
Un-Rewind a Novel
The Rewind feature also lets you jump to a later version of your novel. Maybe you decide that what your cat wrote is pure gold, and you'd actually rather have that version back. Just access the Rewind dialog and pick the date and time after your cat jumped on your keyboard to restore that version of your novel.
Archive a Novel
If you don't want to see a novel on your Bookshelf anymore, but you want to keep it around, you can archive the novel. Archiving a novel will remove it from your Bookshelf and send it to the Archive. For example, let's say you've written a first draft of a novel and then cloned it to create a second draft. If you want to keep the first draft, but don't want it cluttering up your Bookshelf, you can archive that version of the novel. Archiving can also be useful when you have a novel you don't want to work on anymore, but just can't bring yourself to delete completely.

To archive a novel, hover your cursor over the novel to display the options for the novel. Then click the Archive icon . To make sure you want to archive the novel, a confirmation dialog will appear.
Click
Yes. Archive my novel. to archive the novel. The novel will be removed from the bookshelf and display in the Archive.
View Archived Novels
To view archived novels, click the drop-down in the upper right corner of the bookshelf, and then select Archived Novels. The Bookshelf will display any novels that you've archived.To switch back to active novels, click the drop-down and select Active Novels.
Restore a Novel from the Archive
If you previously archived a novel and now want to bring it back to your Bookshelf, you can restore the novel.

To restore a novel, access the novel in the Archive. Hover your cursor over the novel to display the options for the novel. Then click the
Restore icon . The novel will be removed from the Archive and display on your Bookshelf.
Delete a Novel
Maybe you've decided a novel was a horrible idea or maybe you created it on accident. Whatever your reason, you can delete a novel from the Bookshelf at any time. (This option is here in case you want it, but we highly recommend you simply archive your novel so that you can access it again if you change your mind!)

To delete a novel, hover your cursor over the novel to display the options for the novel.
Then click the
Trash icon . To make sure you're absolutely certain you want to delete the novel, a confirmation dialog will appear, where you'll need to type the exact title of your novel before clicking Yes. Delete my novel. to delete your novel.
Import a Novel
For more information about importing a novel from Microsoft Word to NovelPad, refer to Import a novel from Microsoft Word.
Log out of Novelpad
We don't want to see you go, but if you need to log out of NovelPad, simply click Log Out in the top right corner of the Bookshelf.

Manuscript

The Manuscript contains the entire text of all your scenes on the Chapters board. This view is how your novel would look if you compiled all of your chapters and scenes into one big document. Chapters are divided by title and scenes are separated by a line divider. It is, essentially, your novel from beginning to end. You can write directly in the Manuscript, including adding and removing scenes. Any changes that you make in the Manuscript are reflected in the corresponding scene cards and chapter cards. For example, if you change a chapter title in the Manuscript, the chapter title will also be changed on the Chapters board.

Change the Look
You can change the overall look of the Manuscript, such as the font, paragraph and line spacing, and page width, using the options on the Settings screen. For more information about these options, refer to Settings.
Edit the Novel Title
The Manuscript is where you can edit the title of your novel. This is the same title that appears on your novel on the Bookshelf.

To edit your novel's title, simply change the bold title text at the top of the Manuscript. Your changes will be automatically saved.
Edit the Author Name
The Manuscript is where you can edit the author name that appears on your novel. When you update the author name in the Manuscript, the name will automatically update on the novel on the Bookshelf.

To edit the author name, simply change the text at the top of the Manuscript. Your changes will be automatically saved.

By default, the author name is the pen name you sign up for your NovelPad account with. Changing the pen name in your account will change the author name for any novels you create after the change.
Edit the Novel Description
The novel description is the italicized text between the author name and the first chapter heading. You can use this text for anything, such as an introductory quote or as your novel's cover blurb.

To edit your novel's description, simply change the text at the top of the Manuscript. Your changes will be automatically saved.
Add a Scene
You can add a scene directly within the Manuscript, allowing you to quickly strike while inspiration iron is hot.

To add a new scene, press Enter at the end of a chapter title. A line divider will appear, indicating that a new scene has been added. You can also create a new scene by pressing Ctrl+Enter on Windows or Cmd+Enter on Mac.

The new scene will also appear on the Chapters board on the corresponding chapter card. By default, the title of the scene card will be "Untitled," and it will be the first scene in the chapter. You can rearrange the scene card on the Chapters board as needed.
Delete a Scene
You can delete a scene directly within the Manuscript.

To delete a scene, place your cursor in the empty scene, and then press Backspace (Delete on a Mac). The line divider will disappear, indicating that the scene has been removed. Note that the content of the scene must first be deleted.

This method is more permanent than archiving a scene. While the scene card will be archived, the content of your scene will be permanently deleted if you've erased it using Backspace (Delete). The scene will also disappear from the Chapters board. If you don't want to necessarily delete the content of the scene but just want to remove the scene from the Manuscript view, refer to Archive or delete a scene.
Spelling & Grammar Check
As you write content, there are some helpful options for formatting and correcting happy mistakes.

By default, ProWritingAid integration is enabled, which provides suggestions for spelling, grammar, and style. You can turn this integration off on the Settings screen.

To access the suggestions, left-click an underlined word. Then select the suggestion you'd rather use. For example, if you've misspelled a word, you can select the correct word from the list, or you can tell the dictionary you did it on purpose and add the word to your novel's dictionary.

The dictionary applies to all novels you've created in NovelPad. Any word you add to the dictionary in one novel will not count as a misspelled word in another novel.
Formatting Text
The text editor also includes a pop-up menu that contains a variety of formatting options, including bold, justification, block quote, heading styles, and highlight. The pop-up menu also displays the number of words in the scene your cursor is currently in and the number of words you've selected.

To access the formatting options, highlight a selection of text. The menu automatically displays.
Show or Hide Comments
If you or an editor have added comments to a scene, you can hide the comments in the editor.

To hide comments, click the Hide Comments icon  on the menu at the top of the editor. Click the icon again to show comments.
Show or Hide Highlights
You can choose to display or hide any highlights in your text, which can make your text easier to read, as needed.

To hide highlights, click the Hide Highlights icon  on the menu at the top of the editor. Click the icon again to show highlights.
Hide the Formatting Menu
If you're a minimalist or just get easily distracted, you can disable the formatting menu from appearing when you highlight text. When the formatting menu is disabled, you can still use shortcut keys (such as Ctrl+B) to format your text.

To disable the formatting menu, navigate to the Manuscript board.
Then click the
Disable Formatting Dropdown icon  on the menu that drops down from the Manuscript icon. Click the icon again to enable the formatting menu.
Find & Replace Text
Press Ctrl+F (or Cmd+F on a Mac) to bring up the Find and Replace tool. By default, the tool displays only the Find function.

Click the Expand icon  to show the Replace function.
Click the Close icon  to close the Find and Replace tool.

To search for a term in your Manuscript, enter a term in the
Find field and then press Enter. You can navigate through the results by clicking Previous or Next.

To replace a term, enter the new term in the
Replace field. Click Replace to replace a single instance of a found term. Click Replace All to replace all instances of the found term.

There are certain common words that are not included in the search functionality, such as "the" and "and". If the word is too common, it may be included on this list and you may not be able to find the word using the find and replace feature.

Chapters

The Chapters board is where you can create and manage the chapters in your novel. The Chapters board works like a bulletin board, allowing you to easily rearrange your chapters and scenes as you might with index cards or sticky notes. A chapter is made up of a group of scene cards, and you can add as many chapters and scene cards to the board as you need. Any scene card added to the Chapters board will appear in your Manuscript.

A chapter is a group of scene cards that can help you organize your scenes at a higher level. The order in which you arrange your chapters and scenes on the Chapters board is the order in which they will appear in your Manuscript.‍

Create a Chapter
To add a new chapter to the Chapters board, click Add Chapter at the end of your chapters list. A new chapter will appear, where you can enter the name of the chapter. Click Add to add the chapter.

The new chapter will be added to the end of your chapters list, and you can rearrange  on the Chapters board as needed.

You need to give your new chapter a title. If you click away or press Enter without entering a title, the chapter will not be added.
Rename a Chapter
If you need to rename a chapter, you can do so at any time.

To rename a chapter, click the title of the chapter. The chapter title will become editable. Enter the new chapter name, and then press Enter to save the new title.
View or Edit a Chapter
You can view the entire contents of a chapter by clicking the Edit icon  at the top of the chapter. The chapter contents will display in the Editor and will include all of the scenes in the chapter, each separated by a line divider. For example, if you view a chapter that contains four scene cards on the Chapters board, the contents of all four scenes will display in the Editor view.

Any changes you make in the Editor view will apply to the individual scene you made the change in. So let's say you added a new paragraph in the Editor view and that paragraph was in the first scene (in this case, the first section before the first line divider). If you then view that scene on its scene card or anywhere else in NovelPad, such as the Manuscript, the new paragraph will be there.
Merge Chapters
You can merge a chapter into the previous chapter, allowing you to quickly combine two chapters. Merging a chapter into the previous chapter moves all scenes from the selected chapter into the chapter before it.

To merge chapters, click the Options icon  on the chapter you want to merge.
Then select
Merge into Previous Chapter. The scenes from the current chapter will move to the previous chapter card, and the current chapter card will be deleted.

For example, suppose you want to merge chapters 1 and 2 in your novel into one chapter. On the chapter 2 card, click the Options icon , and then select Merge into Previous Chapter. The scenes from chapter 2 will move to the chapter 1 card, and the chapter 2 card will be deleted.
Split a Chapter
You can split a chapter in two, retaining some scenes in the original chapter and moving the remaining scenes into a new chapter. This option is helpful if you find yourself with a very long chapter that would work better as two or more chapters, allowing you to quickly split the chapter into two chapters.

To split a chapter, select the last scene card you want to keep in the original chapter. For example, if you want the third scene and beyond to be put into a new chapter, select the card for the second scene. Click the Options icon , and then select Split Chapter After Scene. The scenes after the selected scene will be removed from that chapter and moved to a new chapter card.
Delete a Chapter
When you delete a chapter on the Chapters board, the scenes in that chapter are removed from the Chapters board but are not completely deleted from your novel. Instead, the chapter is removed from the Chapters board, and the scenes in that chapter are archived, allowing you to add them back if you regret your decision or simply deleted them by mistake.

To delete a chapter, click the Options icon  at the top of the chapter card. Then click Delete on the menu that appears. Click Okay on the confirmation dialog to delete the chapter.

While the chapter as a whole cannot be restored, all scenes in the deleted chapter are moved to the archive and can be re-inserted to a chapter at any time.
Organize the Chapters board
You can organize the overall layout of the Chapters board to suit your needs, including the orientation of the board and the order of your chapters and scene cards. You can also filter chapters and scene cards to quickly locate certain parts of your novel based on keywords.
Change the orientation of the Chapters board
You can switch the orientation of the Chapters board between a horizontal layout and a vertical layout using the Orientation icon at the top of the board. Note that the look of the icon will change based on the current layout.

To switch to a horizontal layout, click the Horizontal Orientation icon  at the top of the board.
To switch to a vertical layout, click the Vertical Orientation icon  at the top of the board.

The functionality of each layout is the same, so you can select your orientation purely on preference.
Vertical orientation
Horizontal orientation
Rearrange Chapters & Scene Cards
You can rearrange the chapters and scene cards on the Chapters board by simply dragging and dropping them into place.

To rearrange a chapter card, click in an empty area in the chapter heading and drag the chapter to another location on the board.
To rearrange a scene card, click in an empty area on the scene card and drag the card to another location on the board. You can drag a scene card to another location in the same chapter or you can drag it to a different chapter.
Rearrange a chapter
Rearrange a scene
Filter Chapters
If you have a lot of chapters, you may find it easier to use the filter to quickly find a chapter rather than needing to scroll through your entire list.

To search for a chapter using the filter, click the Filter icon  at the top of the Chapters board. Then enter a keyword in the field. Chapters with titles that include the keyword will stay expanded, while chapters that do not include the keyword will collapse.
Scene cards
A scene card is a smaller level of organization that is useful for dividing your story into the individual scenes that make up a chapter. However, you can use scene cards to contain any amount of content you wish, from a single sentence to an entire magnum opus. Scenes can be edited and managed separately. There are several ways to edit the content of a scene.‍
Scene cards
To add a new scene card to a chapter, click Add Scene at the bottom of a chapter. A new scene card will appear, and you can enter the name of the scene. Click Add to add the scene card.

The new scene card will be added to the end of the list of scenes in the chapter, and you can rearrange it on the Chapters board as needed. How you title the scene card is up to you. Some writers prefer short identifiers such as "Everyone lives happily ever after," while other writers prefer longer descriptions of the details of their scene.
Insert an Existing Scene
An existing scene is a scene that exists on the Plots board or in the Archive or Trash and is not already in a chapter on the Chapters board. This feature can be helpful if, let's say, you've written a scene out of context and didn't know which chapter or plot line you wanted to add it to yet. It is also useful for restoring a scene to the Chapters board or Plots board if you deleted it earlier and now want it back.

To add an existing scene to a chapter, click Insert Existing Scene. A dialog will appear, where you can search for the scene you want to add. For more information about searching for an existing scene, refer to the animation below. On the dialog, simply click a scene to add that scene to the chapter or plot card.

The Insert Existing Scene button will not display if there are no scenes in the Archive or Trash or another board that are not already on the current board.
Rename a Scene Card
f you need to rename a scene, you can do so at any time.

To rename a scene, click any area on the scene card. The scene card title will become editable. Enter the new scene name, and then press Enter to save the new title.
View & Edit a Scene
You can view the entire contents of a scene card by clicking the Edit icon  at the side of the card. The scene contents will display in the Editor and you can add text or make changes, as needed.
Archive or Delete a Scene
We believe that everything you write is worth keeping. Therefore, scenes can never be completely deleted from your novel (you may want it back!). However, you may find that you no longer need a scene and want to remove it from your Manuscript or plot. In that case, there are two options: removing a scene from a card and deleting the scene. Removing a scene from a card sends the scene to the Archive, while deleting the scene sends the scene to the Trash.

To remove a scene from a card, click the Options icon  on the scene you want to remove.
Then click
Remove from Column on the menu that appears. The scene will be sent to the Archive.

To delete a scene (or send it to the Trash), click the
Options icon  on the scene you want to delete.
Then click
Trash on the menu that appears. The scene will be sent to the Trash.

In either case, you can always re-insert your scene into your Manuscript or Plot board at any time.
Create a Plot Card
To add a new plot card to the Plots board, click Add Plot at the end of your plot card list. A new plot card will appear, where you can enter the name of the plot card. Click Add to add the plot card.

The new plot card will be added to the end of your plot card list, and you can rearrange it on the Plots board as needed.

You need to give your new plot card a title. If you click away or press Enter without entering a title, the plot card will not be added.
Rename a Plot Card
If you need to rename a plot card, you can do so at any time.

To rename a plot card, click the title of the plot card. The plot card title will become editable. Enter the new plot name, and then press Enter to save the new title.

You can also edit the title of a plot card by clicking the
Edit Plot icon  at the top of the card. The Edit Plot dialog will open, and you can edit the plot card title in the Title field.
View or Edit a Plot
You can view the entire contents of a plot by clicking the Edit icon  at the top of the plot card. The plot contents will display in the Editor and will include all of the scenes in the plot card, each separated by a line divider. For example, if you view a plot that contains four scene cards on the Plots board, the contents of all four scenes will display in the Editor view.

Any changes you make in the Editor view will apply to the individual scene you made the change in. So let's say you added a new paragraph in the Editor view and that paragraph was in the first scene (in this case, the first section before the first line divider). If you then view that scene on its scene card or anywhere else in NovelPad, such as the Manuscript, the new paragraph will be there.
Edit plot card details
You can also edit plot card information on the Edit Plot dialog. To access the Edit Plot dialog, click the Edit Plot icon  at the top of the plot card. You can edit the following information for a plot card.

Title. Edit the title for the plot card.
Color. Select a color label for the plot card. This applies the color label to each scene card in the plot.
Description. Enter a description for the plot.
Delete a Plot Card
When you delete a plot card on the Plots board, the scenes in that plot card are removed from the Plots board but are not completely deleted from your novel. Instead, the plot card is removed from the Plots board, and the scenes in that plot are archived, allowing you to add them back if you regret your decision or simply deleted them by mistake.

To delete a plot card, click the Edit icon  at the top of the plot card. The Edit Plot dialog will open.
Click
Delete on the Edit Plot dialog. Then click Okay on the confirmation dialog that appears.
Scene cards
A scene card is a smaller level of organization that is useful for dividing your story into the individual scenes that make up a chapter. However, you can use scene cards to contain any amount of content you wish, from a single sentence to an entire magnum opus. Scenes can be edited and managed separately. There are several ways to edit the content of a scene.

Scene cards that exist on the Plots board are not included in your Manuscript unless they are also on the Chapters board. Scene cards that are only located on the Plots board will not appear in your Manuscript. The same scene card can exist on both the Plots board and the Chapters board. For more information about the differences between the Plots board and the Chapters board, refer to What's the difference between the Plots board and the Chapters board?
Create a Scene Card
To add a new scene card to a plot, click Add Scene at the bottom of a card. A new scene card will appear, and you can enter the name of the scene. Click Add to add the scene card.

The new scene card will be added to the end of the list of scenes in the plot, and you can rearrange it on the Plots board as needed. How you title the scene card is up to you. Some writers prefer short identifiers such as "Nick moves to West Egg," while other writers prefer longer descriptions of the details of their scene.
Insert an Existing Scene
An existing scene is a scene that exists on the Chapter board or in the and is not already in a plot card on the Plots board. This is the easiest way to "import" scenes from your Chapters board to arrange them on your Plots board.

To add an existing scene to a plot card, click Insert Existing Scene. A dialog will appear, where you can search for the scene you want to add.
For more information about searching for an existing scene, refer to the animation
below. On the dialog, simply click a scene to add that scene to the plot card.

The same scene card can be added to multiple plot cards.
Rename a Scene Card
If you need to rename a scene, you can do so at any time.

To rename a scene, click any area on the scene card. The scene card title will become editable. Enter the new scene name, and then press Enter to save the new title.
Organize the Plots board
You can organize the overall layout of the Plots board to suit your needs, including the orientation of the board and the order of your plot cards and scene cards. You can also filter plots and scene cards to quickly locate certain parts of your novel based on keywords.Change the orientation of the Plots boardRearrange plot and scene cardsFilter plot cards
Change the Orientation of the Plots Board
You can switch the orientation of the Plots board between a horizontal layout and a vertical layout using the Orientation icon at the top of the board. Note that the look of the icon will change based on the current layout.

To switch to a horizontal layout, click the Horizontal Orientation icon  at the top of the board.
To switch to a vertical layout, click the
Vertical Orientation icon  at the top of the board.

The functionality of each layout is the same, so you can select your orientation purely on preference.
Vertical orientation
Horizontal orientation
Rearrange Plot & Scene Cards
You can rearrange the plot and scene cards on the Plots board by simply dragging and dropping them into place.

To rearrange a plot card, click in an empty area in the plot heading and drag the plot to another location on the board.
To rearrange a scene card, click in an empty area on the scene card and drag the card to another location on the board. You can drag a scene card to another location in the same plot card or you can drag it to a different plot card.

Rearranging plot or scene cards on the Plots board does not change the order of the scenes on the Chapters board or your Manuscript.
Rearrange a Plot Card
Rearrange a Scene
Filter Plot Cards
If you have a lot of plot cards, you may find it easier to use the filter to quickly find a plot rather than needing to scroll through your entire list.

To search for a plot using the filter, click the Filter icon  at the top of the Plots board. Then enter a keyword in the field. Plot cards with titles that include the keyword will stay expanded, while plot cards that do not include the keyword will collapse.
Create a Character Card
For a character to appear on the Characters board, you'll need to add a character card for that character.

To add a new card to the Characters board, click Add Character at the end of your characters list. A new character card will appear, where you can enter the main name you use for the character.
Click
Add to add the character card.

You need to give the new card a name. If you click away or press Enter without entering a name, the character card will not be added.

The new character card will be added to the end of your characters list, and all of the scenes that the character is mentioned in will automatically appear on their character card. You can rearrange the card on the Characters board as needed.

Scenes can be duplicated across character cards if two or more characters appear or are referenced in the same scene. For example, a scene about a conversation between Hansel and Gretel would appear on both Hansel's character card and Gretel's character card.
Rename a Character Card
If you need to change a character's primary name, you can do so at any time. There are two ways you can edit the card name: directly on the card or on the Edit Character dialog.

Keep in mind that the character cards only pull scenes on exact name matches or nicknames. For example, if you have a character named "Gretel" but you label the character's card name as "Grettie," only scenes that mention Gretel by the name "Grettie" will appear on the card, unless you have also added "Gretel" as a nickname for the character card.

To rename a character card directly on the card, click the name of the character card. The card name will become editable. Enter the new character name, and then press Enter to save the new name.

You can also edit the name of a character card by clicking the
Edit Character icon  at the top of the card. The Edit Character dialog will open, and you can edit the main character name in the Name field.
Add Character Nicknames
he nicknames feature is handy for telling NovelPad the other names your character can be addressed by, so that all of the scenes involving that character are pulled into the character's card. For example, if you write a novel about a character whose proper name is Daniel Danielson, the narrator and the other characters will probably not exclusively refer to this character as Daniel Danielson. The townspeople refer to him as "Investigator Dan," while his friends call him just "Dan," and perhaps his mother calls him "Danny Boy". If you write an entire scene where the character is never called "Daniel Danielson," that scene will not be pulled into his character card unless you have added his other names as nicknames.

To add a nickname, click the Edit Character icon  at the top of the character card. On the Edit Character dialog, click the Add icon  in the Nicknames section. Type the nickname in the field that appears, and then press Enter or click the Add icon  again to add the nickname.

Keep in mind that using parts of a name when multiple characters have the same name will probably lead to pulling scenes into the incorrect character card. For example, if your main character Hansel has a grandmother named "Grandma" and a side character also refers to his grandmother as "Grandma," adding "Grandma" as a nickname for both grandmother character cards will pull in scenes for both Hansel's grandmother and the side character's grandmother.

You can delete a nickname at any time by clicking the Delete icon  next to the nickname.
View Character Card Content
You can view the content for all of the scenes a character is in by clicking the Edit icon  at the top of the character card. The scene contents will display in the Editor, which will include all of the scenes in the character card, each separated by a line divider. For example, if you view a character card that contains four scene cards on the Characters board, the contents of all four scenes will display in the Editor view.

Any changes you make in the Editor view will apply to the individual scene you made the change in. So let's say you added a new paragraph in the Editor view and that paragraph was in the first scene (in this case, the first section before the first line divider). If you then view that scene on its scene card or anywhere else in NovelPad, such as the Manuscript, the new paragraph will be there.
Add Character Information
You can add character information, including nicknames and biography details, on the Edit Character dialog. To access the Edit Character dialog, click the Edit Character icon  at the top of the character card. You can add the following information for a character card.

Name. Edit the main name you use to refer to the character. This is the title of the character card.
Nicknames. Add nicknames for the character. They can also be used to pull scenes the character appears in.
Biographical Information. Enter as much information about your character as you want to.
Organize the Characters board
You can organize the overall layout of the Characters board to suit your needs, including the orientation of the board and the order of your character cards. You can also filter character cards to quickly locate your characters based on keywords.
Change the Orientation of the Character Board
You can switch the orientation of the Characters board between a horizontal layout and a vertical layout using the Orientation icon at the top of the board. Note that the look of the icon will change based on the current layout.

To switch to a horizontal layout, click the Horizontal Orientation icon  at the top of the board.
To switch to a vertical layout, click the
Vertical Orientation icon  at the top of the board.

The functionality of each layout is the same, so you can select your orientation purely on preference.
Vertical Orientation
Horizontal Orientation
Rearrange Character Cards
You can rearrange the character cards on the Characters board by simply dragging and dropping them into place.

To rearrange a character card, click in an empty area in the card heading and drag the card to another location on the board.

Rearranging character cards on the Characters board does not change the order of the scenes on the Chapters board or your Manuscript. In addition, you cannot rearrange the scene cards on a character card. Scenes appear in the order they appear in your Manuscript.
Filter Character Cards
If you have a lot of character cards, you may find it easier to use the filter to quickly find a plot rather than needing to scroll through your entire list.

To search for a character using the filter, click the Filter icon  at the top of the Characters board. Then enter a character name in the field. Cards with names that include the keyword will stay expanded, while cards that do not include the keyword will collapse.

Entries in the Filter field are case-sensitive.
Delete a Character Card
You can delete a character card at any time. Note that deleting a character card does not delete or remove the scenes associated with that character from anywhere else in NovelPad. However, biography information and nicknames will be lost.

To delete a character card, click the Edit Character icon  at the top of the character card. The Edit Character dialog will open. Click Delete on the Edit Character dialog. Then click Okay on the confirmation dialog that appears.
Create a Location Card
For a scene to appear on the Locations board, you'll first need to create a card for that location.

To add a new card to the Locations board, click
Add Location at the end of your locations list. A new location card will appear, where you can enter the location name. Click Add to add the location card.

You need to give the new card a name. If you click away or press Enter without entering a name, the location card will not be added.

The new location card will be added to the end of your locations list. You can rearrange the card on the Locations board as needed.
Tag a Scene with a Location
Once you've added the location you want to track, you can tag scenes in your novel with that location. When a scene is tagged with a location, the scene will display in the corresponding location card on the Locations board.

To tag a scene with a location, click the Options icon  on the scene card you want to tag. Click the Location drop-down on the menu that appears, and then select the location you want to tag the scene with. Click anywhere out of the menu to save your selection.

Once you tag a scene card, you'll see the location appear in the details on the scene card. The scene card will also now display on the location card on the Locations board.
Rename a Location Card
If you need to change a location name, you can do so at any time. There are two ways you can edit the card name: directly on the card or on the Edit Location dialog.

To rename a location card directly on the card, click the name of the location card. The card name will become editable. Enter the new location name, and then press Enter to save the new name.

You can also edit the name of a location card by clicking the
Edit Location icon  at the top of the card. The Edit Location dialog will open, and you can edit the location name in the Name field.
View Location Card Content
You can view the content for all of the scenes on a location card by clicking the Edit icon  at the top of the location card. The scene contents will display in the Editor, which will include all of the scenes added to the location card, each separated by a line divider. For example, if you view a location card that contains four scene cards on the Locations board, the contents of all four scenes will display in the Editor view.

Any changes you make in the Editor view will apply to the individual scene you made the change in. So let's say you added a new paragraph in the Editor view and that paragraph was in the first scene (in this case, the first section before the first line divider). If you then view that scene on its scene card or anywhere else in NovelPad, such as the Manuscript, the new paragraph will be there.
Add Location Information
You can add location information, such as a description of the location or a reminder of when in your novel the location appears, on the Edit Location dialog. To access the Edit Location dialog, click the Edit Location icon  at the top of the location card. You can add the following information for a location card.

Name. Edit the location name. This is the title of the location card.
Information. Enter as much information about your location as you want to.
Organize the Locations board
You can organize the overall layout of the Locations board to suit your needs, including the orientation of the board and the order of your location cards. You can also filter location cards to quickly locate your locations based on keywords.
Change the Orientation of the Locations Board
You can switch the orientation of the Characters board between a horizontal layout and a vertical layout using the Orientation icon at the top of the board. Note that the look of the icon will change based on the current layout.

To switch to a horizontal layout, click the Horizontal Orientation icon at the top of the board.
To switch to a vertical layout, click the
Vertical Orientation icon  at the top of the board.

The functionality of each layout is the same, so you can select your orientation purely on preference.
Vertical Orientation
Horizontal Orientation
Rearrange Location & Scene Cards
You can rearrange the location and scene cards on the Locations board by simply dragging and dropping them into place.

To rearrange a location card, click in an empty area in the location heading and drag the card to another spot on the board.
To rearrange a scene card, click in an empty area on the scene card and drag the card to another spot on the board. You can drag a scene card to another spot in the same location card or you can drag it to a different location card. If you drag it to another location card, the location tag for the scene automatically updates to the new location.

Rearranging location or scene cards on the Locations board does not change the order of the scenes on the Chapters board or your Manuscript.
Rearrange a Plot Card
Rearrange a Scene
Filter Location Cards
If you have a lot of location cards, you may find it easier to use the filter to quickly find a location card rather than needing to scroll through your entire list.

To search for a location using the filter, click the Filter icon  at the top of the Locations board. Then enter a location name in the field. Cards with names that include the keyword will stay expanded, while cards that do not include the keyword will collapse.

Entries in the Filter field are case-sensitive.
Delete a Location Card
You can delete a location card at any time. Note that deleting a location card does not delete or remove the scenes associated with that location from anywhere else in NovelPad. However, location information on the Edit Location dialog will be lost.

To delete a location card, click the Edit Location icon  at the top of the location card.
The Edit Location dialog will open.
Click
Delete on the Edit Location dialog.
Then click
Okay on the confirmation dialog that appears.
How to set a Writing Goal
You can set a writing goal to help you decide how much you want to write and when you want to write.

Once you set a goal, you can always change the goal at any time. Your progress will always stay the same. Switching goal types (for example, words versus minutes) doesn't alter the data for what you've already written.
Set your goal in the Goal section
Number. Enter the number for your goal, such as 500 words per day or 210 minutes per week.

Unit. Select whether you want to track your progress in words or minutes. Do you want to write the same number of words per day, regardless of how long it takes you? Or would you rather spend 30 minutes a day writing, regardless of how many words you write?

Frame. Select the time frame for your goal, such as per day or total. Is it more important that you write 500 words per day because you're not sure how long your story will be? Or do you know you want to hit 100,000 words total?
Track Words In Manuscript or All Scenes
Select whether to track the words from only your Manuscript or from All Scenes in your novel. Selecting All Scenes includes word counts of all scenes in the novel, such as those on the Plots board, regardless of whether they've been added to the Chapters board (and thus your Manuscript).
Date Range
Select a date that your goal will Start On and a date you want to Finish By.
Weekly Writing Schedule
You can indicate whether you intend to write more or less on certain days of the week. For example, perhaps you have much more time on the weekends and could handle a bigger workload those days, or maybe you work a double shift on Wednesdays and won't have any time to write at all.
The selections you make on the Weekly Writing Schedule will help NovelPad determine the goal to assign to a particular day. For example, if you have a goal of writing 700 words per week, and can write extra on weekends but can't write on Wednesdays, your weekly goal may look something like this:
Adapt Schedule To Progress?
Choose whether you want your goals to adapt with your progress.

Yes. Update writing goals for future days based on the progress you've made. This option recalculates your writing schedule based on the progress you've made. If you write more than your goal one day, the goals for your remaining days will be reduced. If you write less than your goal one day, the goals for your remaining days will increase.

No. Do not update writing goals for future days, regardless of the progress you've made. This option will keep the same goal for each day, regardless of how much over or under you were on any given day's goal.

For example, let's say you want to write 50,000 words in 100 days. That averages out to a goal of 500 words per day. On the first day, you write 500 words. On the second day, you only write 300 words, leaving you 200 words behind schedule. If you selected Yes, NovelPad will essentially distribute the missing 200 words over the remaining days, which will bump your writing goal for each remaining day up to something like 502 words to catch up to your overall goal. If you selected No, your goals will show that you need to write 700 words the next day (the 500 per day goal plus the 200 words from yesterday) to catch up to your overall goal.

Conversely, let's say you write 500 words on the first day and 700 words on the second day. With an adaptive schedule, your goals for the remaining days may be something like 498 words per day because you've written an extra 200 words. With a non-adaptive schedule, you will still have a goal of 500 words for each remaining day.

Finally, Click Save to save your goal settings.
Sprints & Vacations
If you know there will be a certain stretch of time where the amount of time you'll have to write will change, you can add a sprint or a vacation to your schedule to add a one-off change in your writing goals. Whether you have an adaptive schedule or not, your writing goals will change to accommodate those days.

A sprint is useful if you know you can write more over a certain period of time. For example, maybe you have Memorial Day off and have no plans, so you want to write a little extra that Monday. You can add a sprint to set a goal that is higher than your typical Monday.

A vacation is useful if you know you won't be able to write as much for a certain period of time. For example, maybe you know you're going out with your friends on St. Patrick's Day and won't get any writing done. You can add a vacation to lower or remove your goals for those specific days.

To add a sprint or vacation, click the Add Sprint or Add Vacation button. Then select the date range for the sprint of vacation. Finally, choose a work level (a lot, normal, little, none) for the period. Click Save to save the sprint or vacation.

If you end up having to work on Memorial Day or your St. Patrick's Day outing gets canceled, you can delete the sprint or vacation by clicking the Trash icon . Then click Save to save the change.
Scene Card Options
Click the Options icon  on a scene card to display a menu of options that you can use to manage that scene.
Second Tab Content
The following options are available for a scene card.
Edit in Manuscript
Opens the scene to its location in the Manuscript.
Note: This option only displays for a scene card that has been added to the Chapters board.
Create Revision
Opens the Revisions dialog, where you can create scene revisions.
Manage Revisions
Opens the Revisions dialog, where you can create, edit, or otherwise manage revisions for the scene.
Note: This option only displays if revisions exist for the scene.
Promote Revision
"Promoting" a revision essentially means that you want the current revision to be the one revision that rules them all. Select this option to keep the current revision.
Important: Promoting a revision deletes all other revisions. A confirmation dialog will display to confirm that you want to promote the revision and delete the other scene revisions.
Note: This option only displays if revisions exist for the scene.
Remove from Column
Removes the scene from the current chapter. When you remove a scene from a chapter, the scene is stored in the archive, and you can re-insert it to any chapter at any time.
Trash
Moves the scene to the Trash. When you delete a scene, it is stored in the Trash but can still be reinserted if you decide you want it again later.
Close
Closes the Options menu.
Color Labels
Choose a color swatch to tag the scene with a color label.
There are a handful of default color labels, but you can create your own custom color labels on the Settings screen.
Chapter
Moves the scene card to the selected chapter. This option is an alternative to dragging and dropping the scene card to another chapter.
Location
Tags the scene card with a location. You can then view your scene cards grouped by location on the Locations board.
Date
Tags the scene card with a date. This feature is helpful for keeping track of the timeline within your novel, which you can view on the Insights board. For example, you can tag a scene card with a date like 05/20/1990 if the scene is a flashback to the narrator remembering the day of her birth.
Daily Word Count & Daily Time Worked
Click the Number icon  to switch to the Daily Word Count graph, which shows the number of words that you've added to the scene by date.
Click the Time icon  to switch to the Daily Time Worked graph, which shows the amount of time you've spent actively working in the scene.
On both charts, you can scroll backward or forward along the dates using the Arrow icons.
View or Edit a Scene
In Group Context

You can view all of the scenes in a group, such as a chapter, plot line, or by character, if you want to edit the scenes with a little more context. In group context, you can view and edit all of the scenes in the group.

To view a scene in section context, click the Edit icon  at the top of the group (such as a chapter card or a plot line card). The Editor slides out from the side of the screen, where you can review or change your content.

Each scene in the group will be separated by a line divider. For example, if you view a chapter that contains four scene cards on the Chapters board, the contents of all four scenes will display in the Editor. Scenes display on the Editor in the same order as their respective scene cards in the group card.
In Manuscript Context

You can view all of the scenes in your novel by editing them in the Manuscript. The Manuscript is the compiled text of all of the chapters and scenes that you've added to the Chapters board.

To view a scene in your entire manuscript, click the Options icon on the screen card.
Then click
Edit in Manuscript on the menu that appears.
Rearrange Scene Cards
You can rearrange the scene cards on the Chapters board or Plots board by simply dragging and dropping them into place.

To rearrange a scene card, click in an empty area on the scene card and drag the card to another location on the board. You can drag a scene card to another location in the same chapter/plot or you can drag it to a different chapter/plot.

You can also move a scene to a different chapter by selecting the chapter on the scene card's option menu. Click the
Options icon  on the scene card. On the menu that appears, select the chapter you want to move the scene to.

Scene cards on other boards, such as the Locations board or Characters board, appear in certain sections automatically based on the details or tags of the scene. For example, if Daisy Buchanan is mentioned in a scene, that scene will automatically appear in the Daisy Buchanan card on the Characters board, if you've created one.
Add a Note to a Scene
You can add notes to scenes to keep track of any sort of thought or additional details you want to associate with a scene, without needing to write that memo in the actual scene. For more information about using notes in NovelPad, refer to Notes.

Click the Note icon  on a scene card to add a note to that scene. The Notes panel slides out from the right side of the screen, where you can add a note to the scene.
Create Scene Revisions
As you're writing, you may imagine a scene panning out in a few different ways. For example, perhaps you have multiple thoughts about how a conversation between your characters plays out, or maybe you want to try setting that conversation in several different settings or moods. With scene revisions, you can write all of those iterations down without creating clutter in a scene or chaos in your Manuscript. Scene revisions allow you to write multiple versions of the same scene while only having one version at a time in your novel. For more information about scene revisions, refer to Scene revisions.

To create a scene revision, click the Options icon  on the scene card you want to create a revision for. Then click Create Revision on the menu that appears. The Revisions dialog opens, where you can create a scene revision.
Create a Color Label
Color labels are created in the Scene Color Labels section on the Settings screen. The Settings screen comes preloaded with five default color labels, but you can delete these or change the colors as you please.

To create a new color label, click the Add button . A color picker will appear, where you can select a color for the label using the slider or by entering a hex code. Once you've selected your color, click Add. Then click the empty label and enter a new label for the color.
Tag a Scene with a Color Label
To tag a scene with a color label, click the Options icon  on the scene card you want to tag. Then select the color label on the menu that appears. Click anywhere out of the menu to save your selection.
Removed a Color Label
To remove a color label from a scene, click the Options icon  on the scene card. Then select the Clear Color icon  on the menu that appears.
Location tags
If you want to track locations in your novel on the Locations board, you'll need to tag your scenes with locations. This process requires creating a location and then tagging a scene with that location.
Create a Location
To create a location, head to the Locations board. Click Add Location. In the new card, enter a name for the location. Then click Add.
Tag a Scene with a Location
Once you've added the location you want to track, you can tag scenes in your novel with that location. When a scene is tagged with a location, the scene will display in the corresponding location card on the Locations board.

To tag a scene with a location, click the Options icon  on the scene card you want to tag. Click the Location drop-down on the menu that appears, and then select the location you want to tag the scene with. Click anywhere out of the menu to save your selection.

Once you tag a scene card, you'll see the location appear in the details on the scene card. The scene card will also now display on the location card on the Locations board.
Remove a Location Tag
To remove a location tag, you can either click the Clear icon on the Location field or you can
select
Location: None from the drop-down menu.
Date tags
You can tag scenes with dates to help keep track of the time line in your novel. This can be useful, perhaps, if you're writing flashbacks in a character's life or if you're writing a mind-bending time travel book. Once you tag scene cards with dates, the dates can be tracked on the Insights board.
Tag a Scene with a Date
To tag a scene with a date, click the Options icon  on the scene card you want to tag. Click the Date field to show a calendar, where you can select the date you want to assign to the scene. You can also directly type the date into the Date field. Click anywhere out of the menu to save your selection.
View Dates on the Insights Board
Once you've added dates to your scenes, you can view your scenes by date on the Insights board. This can be helpful for insights such as seeing the spread of your dates throughout your chapters or seeing which characters appear in which date. The Insights board is designed for flexibility, and dates are one detail you can use for whatever you might need.

For example, viewing Chapters by Date allows you to see the order your in which your dates are written.
Remove a Date Tag
To remove a date tag, click the Options icon  on the scene card. Click in the Date field, highlight the current date on the scene card menu, and then press the Backspace or Delete key.

Scene Revisions

As you're writing, you may imagine a scene panning out in a few different ways. For example, perhaps you have multiple thoughts about how a conversation between your characters plays out, or maybe you want to try setting that conversation in several different environments or moods. With scene revisions, you can write all of those iterations down without creating clutter in a scene or chaos in your Manuscript. Scene revisions allow you to iterate on scene content and try out new ideas while only having one version at a time in your novel.

Create a Scene Revision
To create a scene revision, click the Options icon  on the scene card you want to create a revision for. Then click Create Revision on the menu that appears. The Revisions dialog opens, where you can create a scene revision.

If revisions already exist for a scene, access the Revisions dialog by clicking Manage Revisions.
The Revisions dialog is where you'll write your scene revisions. When you first create a revision for a scene, you'll see your Active Revision (the version currently in the novel) on the left side of the dialog and Revision 1 (your new version) on the right side of the dialog.

Initially, the versions will look the same. To create the new version, you'll type your new content on the Revision 1 side of the dialog.

For example, let's say you have a tipping point scene where your characters can either make a good decision or a bad decision. In your original revision, you write the characters making a good decision, such as going home instead of following a trail of candy down a mine shaft. However, because you know that bad decisions push plots forward, you decide to write a new version of the scene where the characters go down the mine shaft. If you decide to use the new scene, you can simply swap the revisions.
Swap a Revision
The Active Revision is the version that is currently showing in your novel. When you read the content in your chapter or your Manuscript, this is the version that will display. If you decide you'd rather read the alternate version, you can swap the revision out.

To swap a revision, open the Revisions dialog by clicking the Options icon  on the scene card and then clicking Manage Revisions. In the Revisions drop-down on the dialog, select the revision you want to swap to your Active Revision. Then click the Set as Primary icon  to set the revision as the Active Revision.

When you read through your chapter or Manuscript, you'll now see Revision 1 as the Active Revision.
Create Additional Revisions
You can create as many revisions of a scene as you'd like. Perhaps you're changing the whole scene or maybe you're only changing a single word.

To create another revision of your original scene, click the Create Revision icon  in the Active Revision (left) section. A copy of the Active Revision will appear on the right side of the dialog as a new revision.

You can also create a revision of a revision, allowing you to riff off your riff.

To duplicate a revision, click the Duplicate icon  in the Revision (right) section. A copy of the revision will appear on the right side of the dialog as a new revision.
Delete a Revision
To delete a revision, select the revision in the Revision drop-down. Then click the Delete icon.

Deleted scene revisions do not go to the Archive or in the Trash.

Deleting a scene revision is a permanent deletion.
Promote a Revision
When you've decided on the revision you'd like to keep going forward, you can promote the revision. "Promoting" a revision essentially means that you want the current revision to be the one revision that rules them all. When you promote a revision, all other revisions are deleted. A confirmation dialog will display to confirm that you want to promote the revision and delete the other scene revisions.

To promote a revision, click the Options icon  on the revision's scene card. Then click Promote Revision. On the confirmation dialog that appears, click Okay to delete all other revisions of the scene.

The Promote Revision option only displays if revisions exist for the scene.
Collections
Collections are customizable groups of notes. Think of a collection as the subject divider in your notebook, allowing you to group notes that are related to each other. For example, you could have a collection for each of your characters, a collection for your research notes, or a collection where you keep mood notes such as links to playlists or images.
Add a Collection
To add a collection, click Add Collection at the top of the Notes board. A new collection heading appears. Type in the title for your collection, and then press Enter.
Rename a Collection
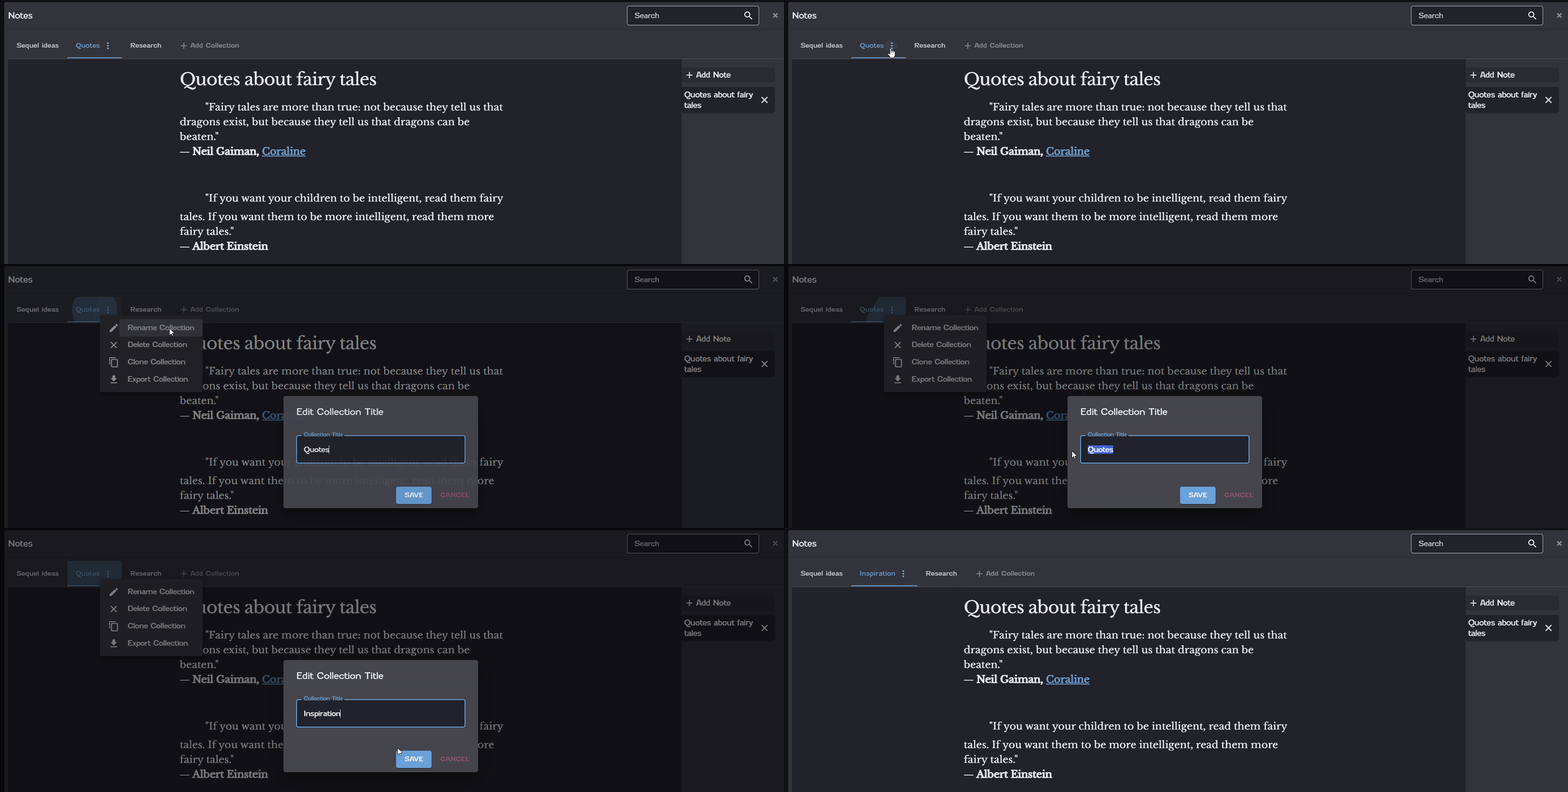
To rename a collection, click the Options icon  on the heading of the collection. Then select Rename Collection on the menu that appears. On the Edit Collection Title dialog, type in the new title for your collection, and then click Save.
Clone a Collection
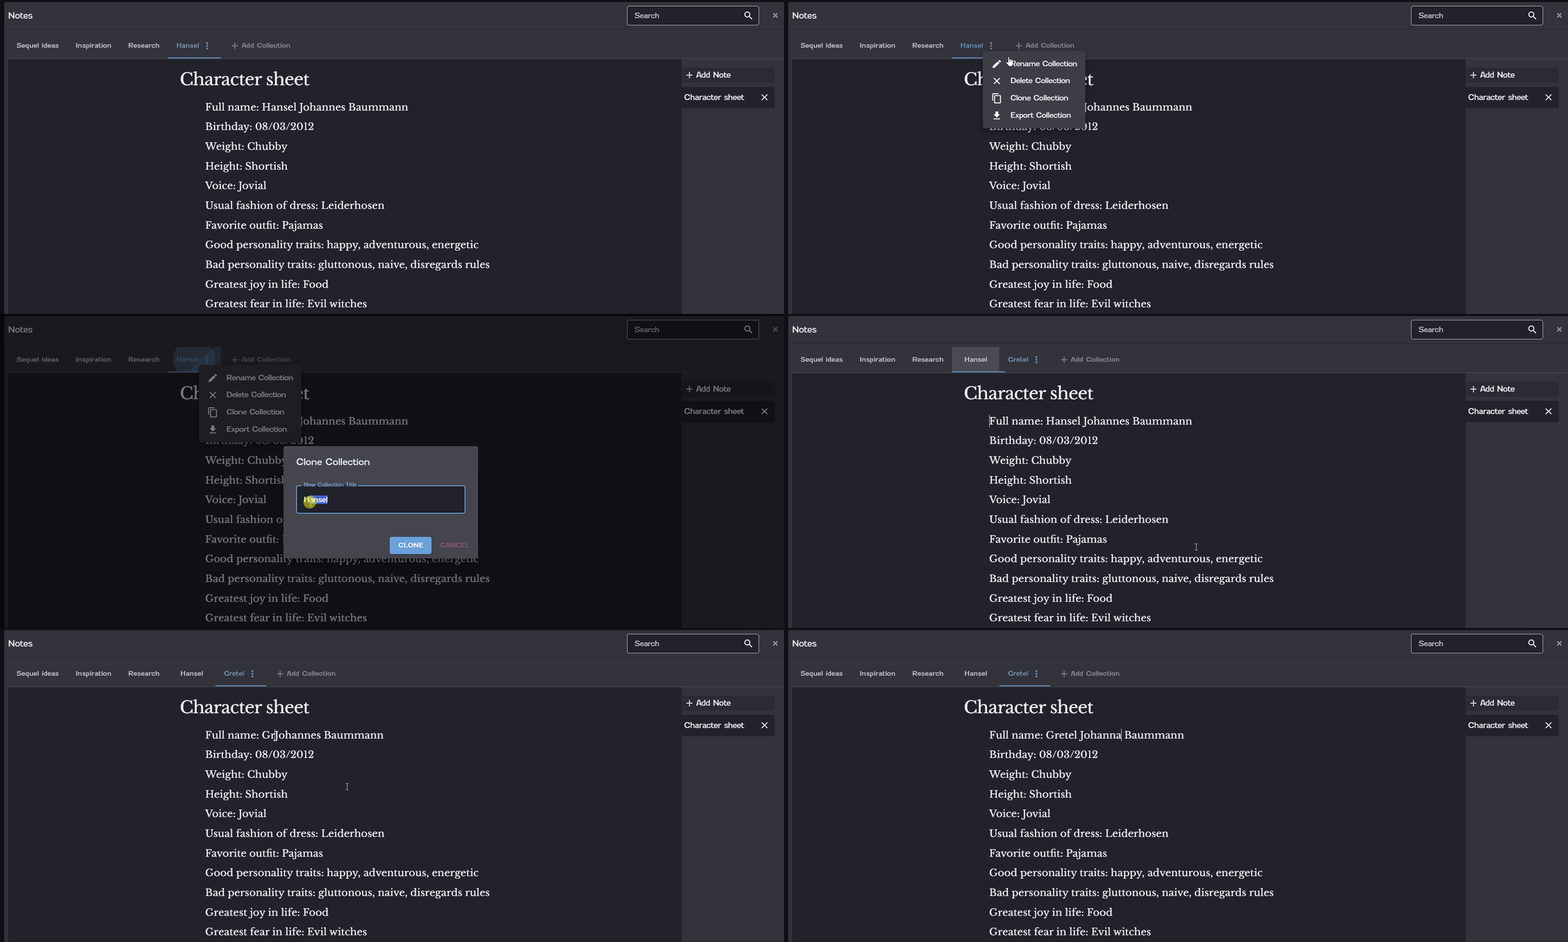
You can quickly copy the contents of a collection by cloning a collection. Cloning a collection creates an exact copy of all the notes in the collection. For instance, let's say you've created a detailed character sheet for your main character. You can easily copy that sheet to a collection for another character by cloning the collection.

To clone a collection, click the Options icon  on the heading of the collection. Then select Clone Collection on the menu that appears. On the Clone Collection dialog, type in a title for the new collection, and then click Clone.
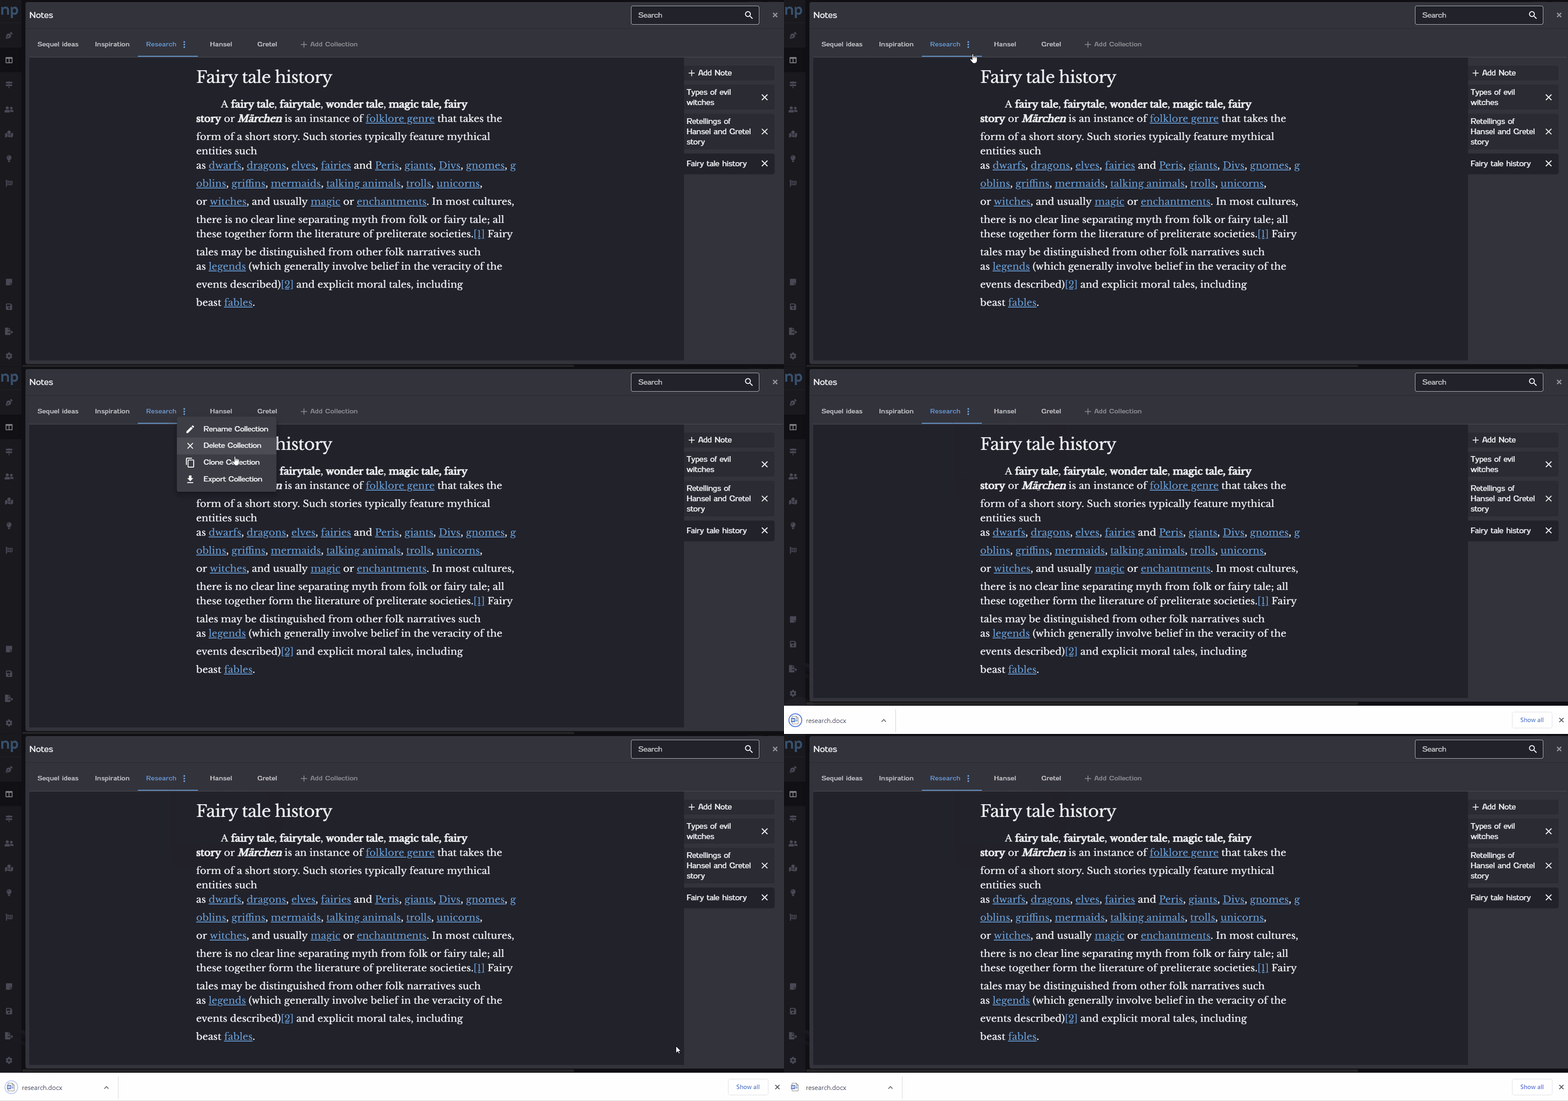
Export a Collection
You can export a collection of notes to Microsoft Word.

To export a collection, click the Options icon  on the heading of the collection. Then select Export Collection on the menu that appears. The collection will download to your computer as a .docx file with the same name as the collection.
Delete a Collection
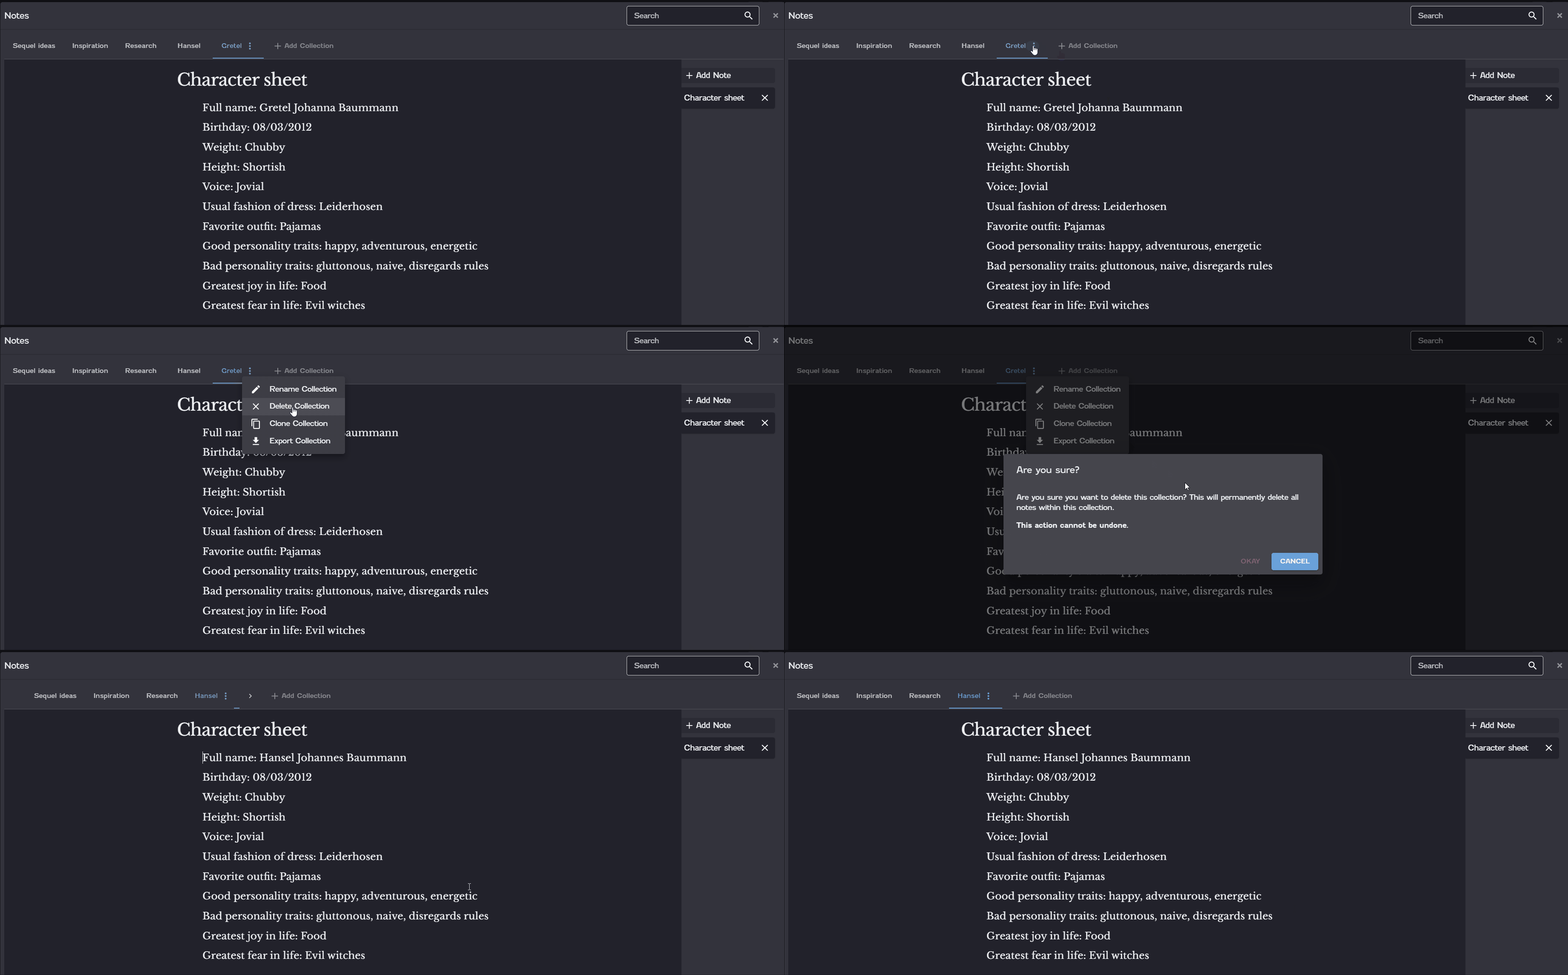
If you don't need a collection of notes anymore, you can delete it at any time.

To delete a collection, click the
Options icon  on the heading of the collection. Then select Delete Collection on the menu that appears. A confirmation dialog appears, confirming that you want to delete the collection.
Click
Okay to delete the collection.

Deleting a collection permanently deletes all of the notes in that collection. The deletion cannot be undone.
Notes
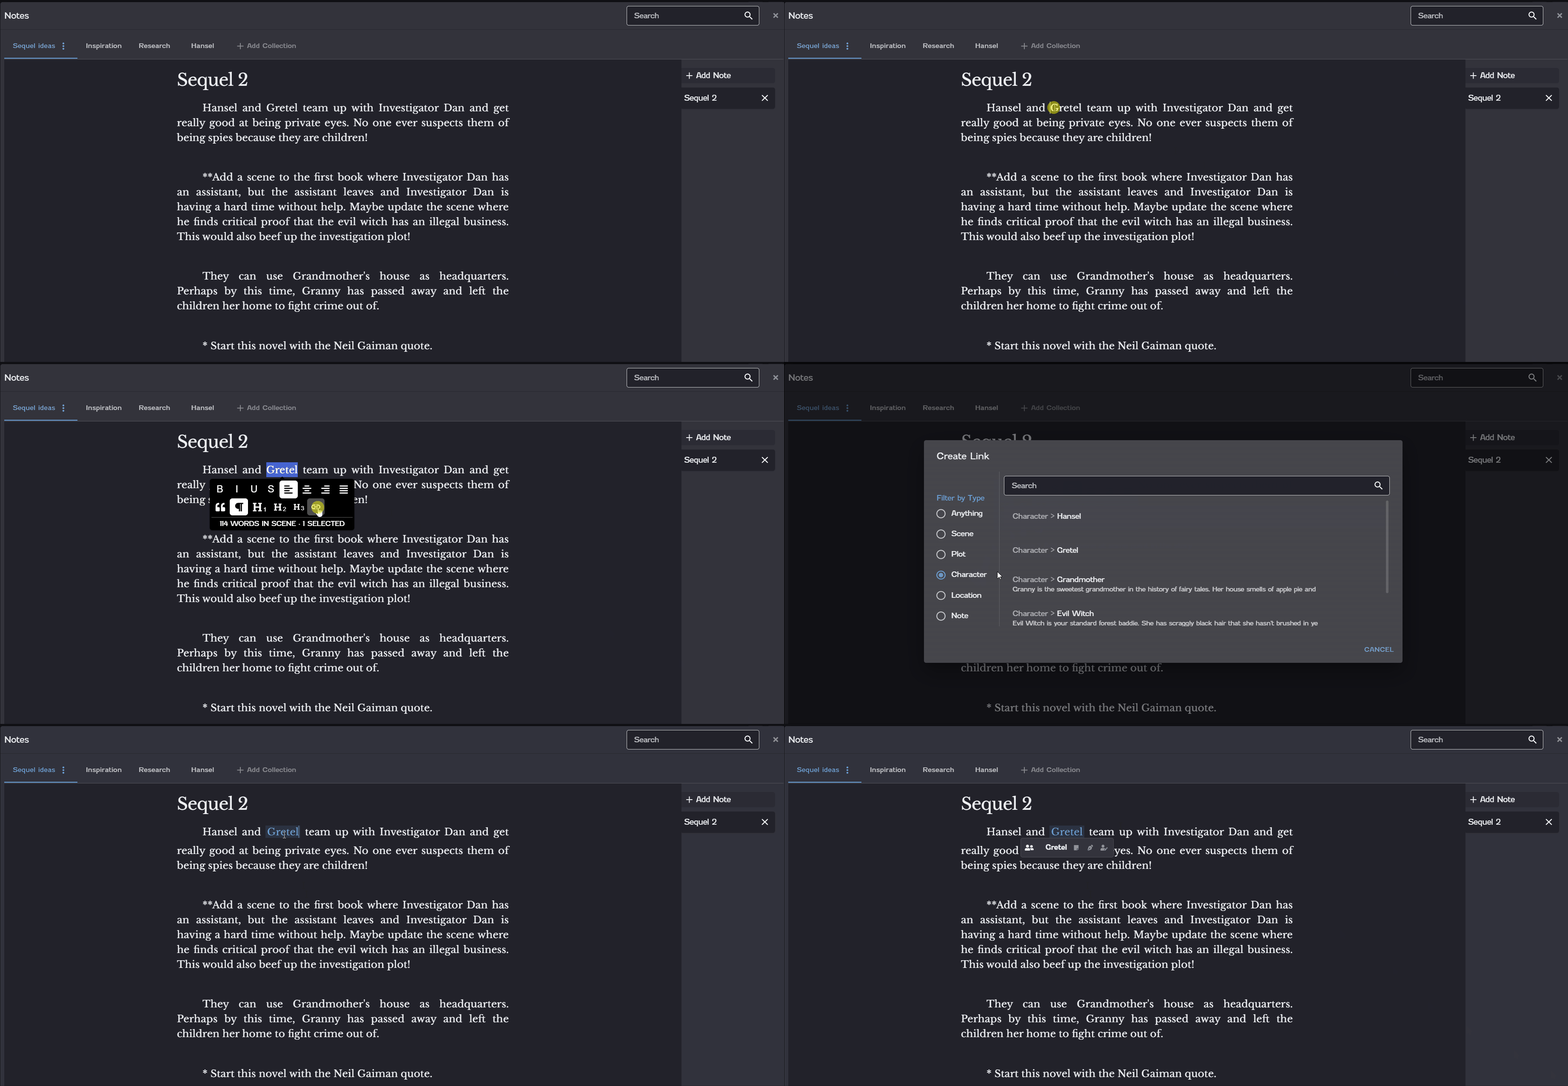
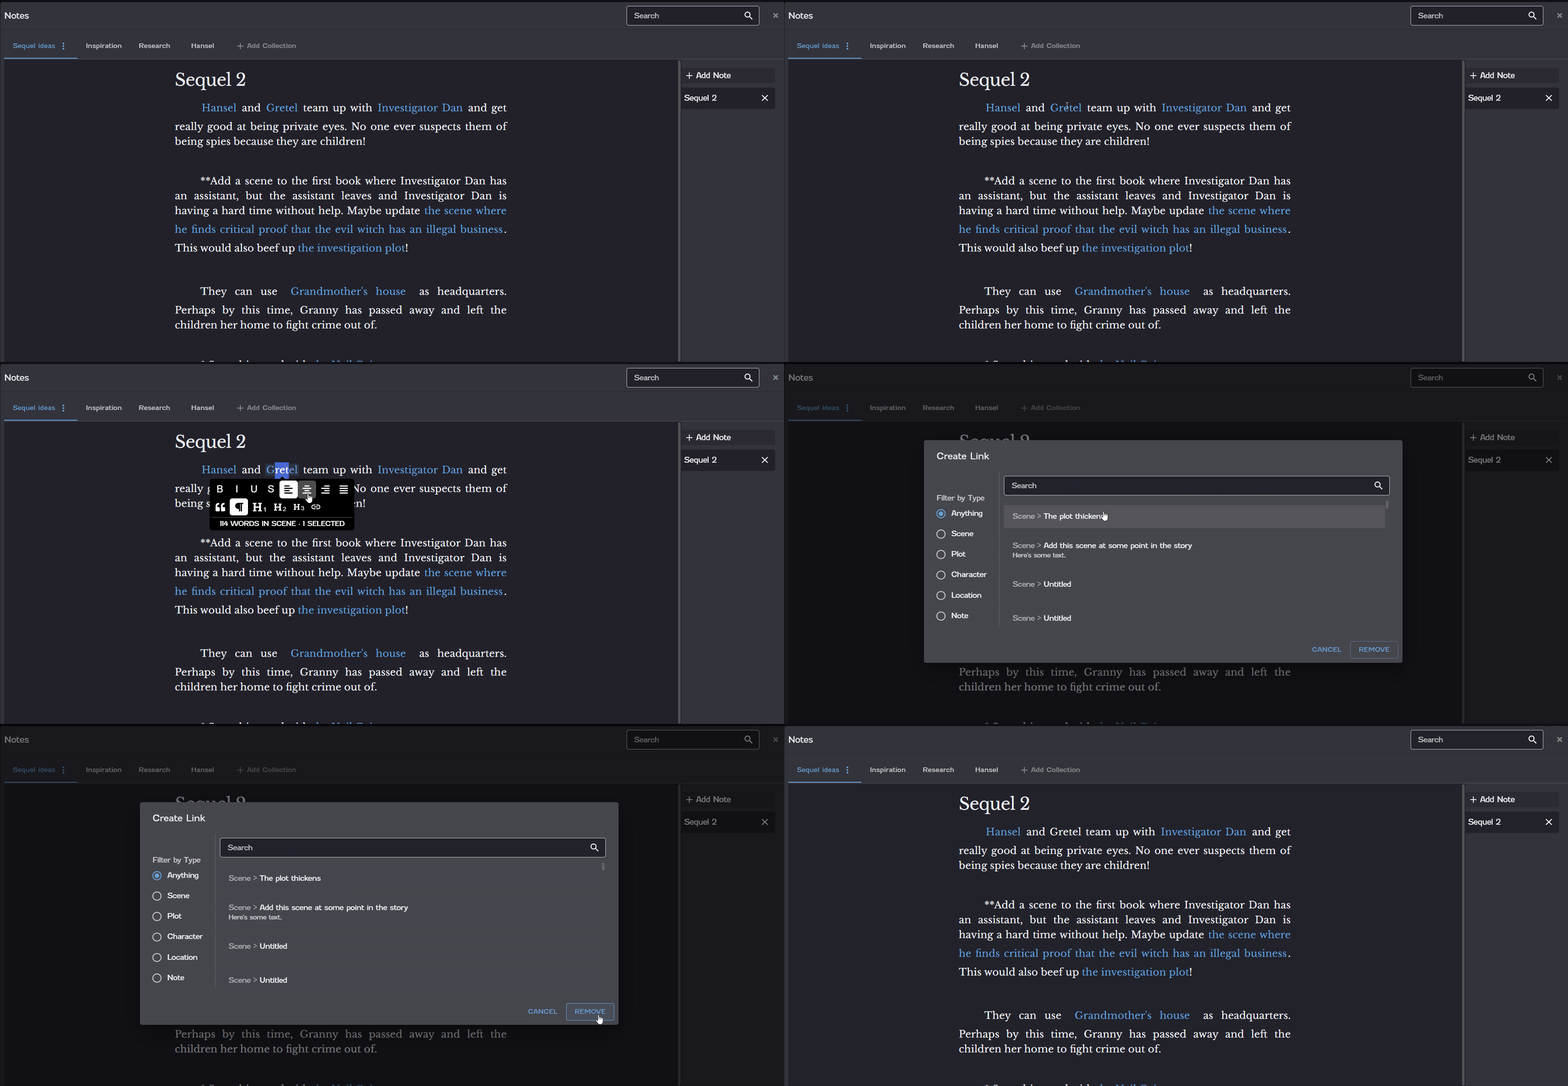
Notes are individual items within a collection. A note can be as long or as short as you want. Any content in a note can also be linked to your scenes, characters, plots, locations, and even other notes—just like a wiki!
Add a Note
To add a note, click Add Note on the right side of a collection. Type in the name of the note, and then press Enter.
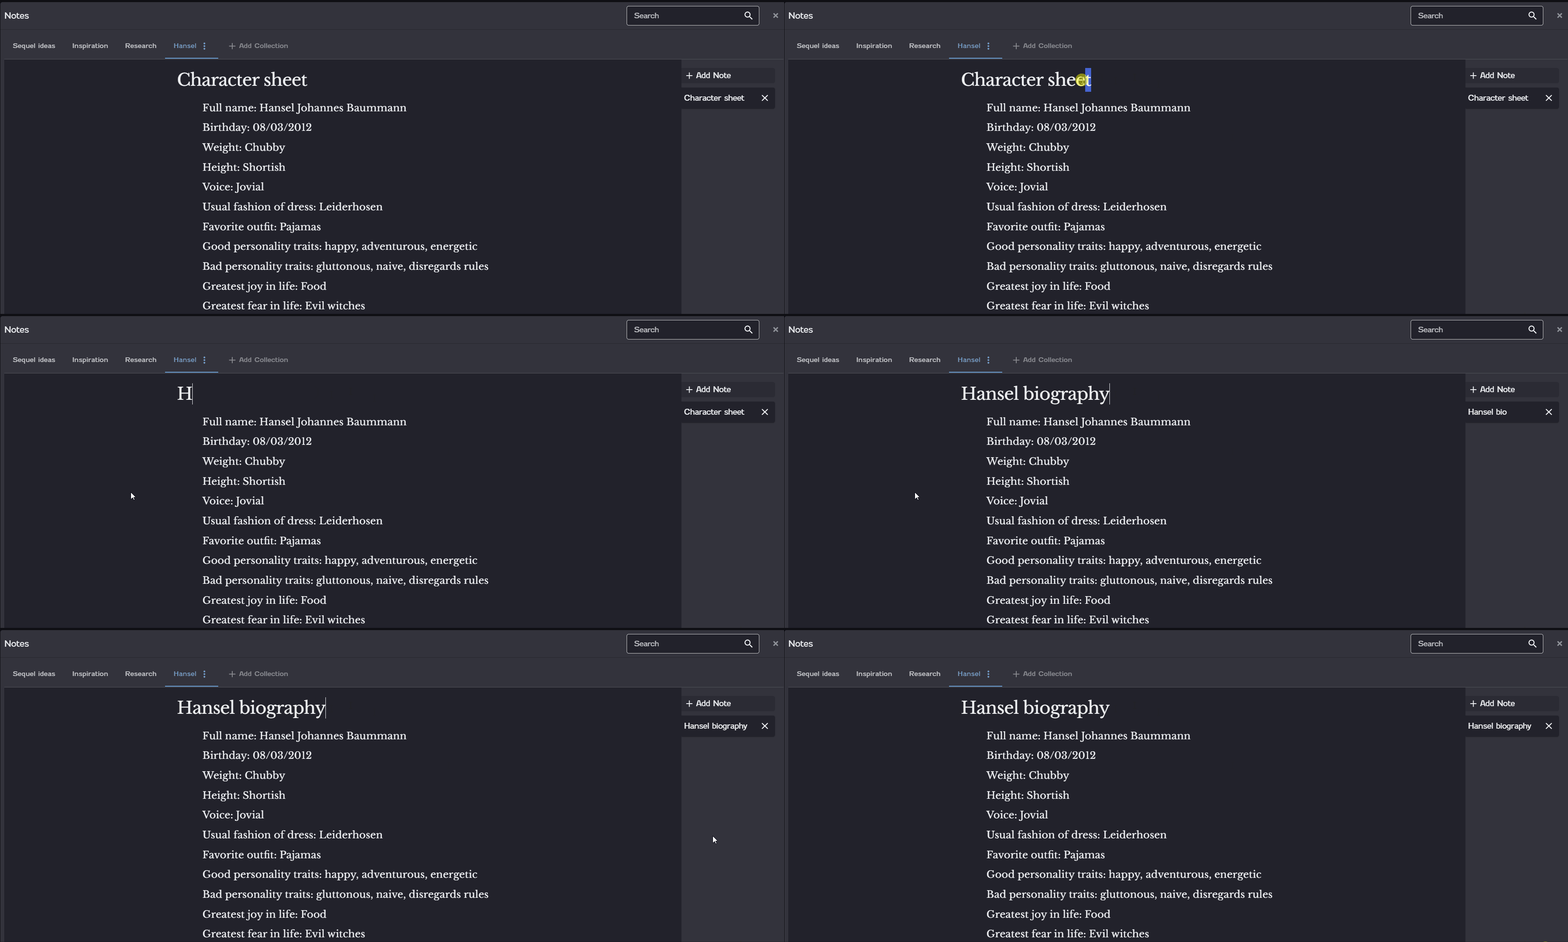
Rename a Note
To rename a note, simply edit the heading at the top of the note. The name on the note tab will change automatically as you type.
Delete a Note
If you don't need a note anymore, you can delete it at any time.

To delete a note, click the Delete icon  on the corresponding note tab. A confirmation dialog appears, confirming that you want to delete the note. Click Okay to delete the note.

Deleting a note permanently deletes the note and its contents. The deletion cannot be undone.

Archive and Trash

We believe that everything you write is worth keeping. Therefore, scenes can never be completely deleted from your novel (you may want it back!) However, you may find that you no longer need a scene and want to remove it from your Manuscript. In that case, there are two options: removing a scene from a chapter and deleting the scene. Removing a scene from a chapter sends the scene to the Archive, while deleting the scene sends the scene to the Trash.

Archive or Delete a Scene
To remove a scene from a card, click the Options icon  on the scene card you want to remove.
Then click
Remove from Column on the menu that appears. The scene card will be sent to the Archive.

To delete a scene (or send it to the Trash), click the
Options icon  on the scene card you want to delete. Then click Trash on the menu that appears. The scene card will be sent to the Trash.

In either case, you can always re-insert your scene into your Manuscript at any time.
Insert an Existing Scene
An existing scene is a scene that exists on the Plots board or in the Archive or Trash and is not already in a chapter on the Chapters board. This feature can be helpful if, let's say, you've written a scene out of context and didn't know which chapter or plot line you wanted to add it to yet. It is also useful for restoring a scene to the Chapters board or Plots board if you deleted it earlier and now want it back.

To add an existing scene to a chapter, click Insert Existing Scene. A dialog will appear, where you can search for the scene you want to add. For more information about searching for an existing scene, refer to the animation below. On the dialog, simply click a scene to add that scene to the chapter or plot card.

The Insert Existing Scene button will not display if there are no scenes in the Archive or Trash or another board that are not already on the current board.
Rewind Feature
To access the Rewind feature, hover your cursor over the novel to display the options for the novel. Then click the Rewind icon . On the Rewind dialog, select the date and time that you want to rewind your novel to. Then click OK.

Rewind only works for changes that were made while connected to the internet. If you made changes in offline mode, Rewind will not be able to rewind those changes.
Un-rewind your novel
The Rewind feature also lets you jump to a later version of your novel. Maybe you decide that what your cat wrote is pure gold, and you'd actually rather have that version back. Just access the Rewind dialog and pick the date and time after your cat jumped on your keyboard to restore that version of your novel.

Sharing

You've put in the hard work to write your novel and now you want to share it with the world! But before you get to the publishing stage, you may need to run your work through a reviewer or an editor. That's where the Sharing feature comes in! Using the Sharing feature, you can create a sharable link for any of your scenes and chapters. This link allows your collaborators to make changes and add comments to your work directly in NovelPad, which you can then merge into your original scene. You can also use the Sharing feature to collaborate in real-time with an editor. How you use the Sharing feature, like your novel, is limited only by your imagination!Example workflowShare a scene or chapterEditor viewMerge a shared scene or chapterDelete a share link

Example Workflow
The Sharing feature was created to support interactions between a writer and a reviewer, the feature—like most features in NovelPad—can be used in any way that suits your needs. Here we'll walk through an example workflow to show you one of the ways that the Sharing feature can work.

Let's say that you've written your first scene in your novel and you're very excited to share it with your editor, who has been waiting eagerly for the scene. He demands you send it over for review right away!
1. You create a shareable link to your scene and send the link to your editor.
2. Your editor clicks the link, which opens the NovelPad editor. He changes a few words, corrects a few errors, and leaves you some comments.
3. Your editor gives you a call and lets you know he's done reviewing your work.

4. You go back to the scene in NovelPad and merge your editor's version to your original version, which pulls in all of his changes and comments.
Share a scene or chapter
ou can use the Sharing feature to share an individual scene (scene card) or an entire chapter (chapter card).

To share a scene, click the Options icon  on the scene card you want to share. Then click Open Share Settings on the menu that appears. A dialog appears, letting you know that you'll be creating a sharable link that will provide access to your content. Click Create to create the link. A new dialog appears with the URL that you can copy and share.

To share a chapter, access the chapter on the
Chapters board. Click the Options icon  at the top of the chapter card that you want to share. Then click Open Share Settings on the menu that appears. A dialog appears, letting you know that you'll be creating a sharable link that will provide access to your content. Click Create to create the link. A new dialog appears with the URL that you can copy and share.

Creating a share link creates a snapshot of the scene or chapter, which means that each share link is a separate and unique instance of the scene or chapter at the time that the share link was created. Any changes you make to the original scene or chapter after it's been shared will not reflect in the shared version. For example, if you notice a typo and fix it, you'll need to send your reviewer a new link. When all of the desired changes have been made, the original and shared versions of the scene or chapter can be merged to sync the changes into your Manuscript.
Editor View
When you share a link, your reviewer will be able to make changes and leave comments directly in a mini-version of NovelPad. When a reviewer first opens a share link, they'll need to create a NovelPad account. Any changes and comments made in the Editor view are automatically saved within the share link.

Reviewers who create an account to view a share link are not required to purchase a NovelPad subscription. However, spell check and grammar check from ProWritingAid are not included for free editor accounts.

To collaborate in real-time with your reviewer, click Open in new tab on the Share Settings dialog. This will open the same share that you sent your reviewer.
The Editor version of NovelPad includes the following features.
Disable/enable comments
Your editor can choose to display comments or hide comments.
Disable/enable highlights
Your editor can choose to display highlights or hide highlights.
Upgrade
Your editor can choose to upgrade to a paid NovelPad subscription, which provides spell check and grammar check from ProWritingAid along with access to the entire NovelPad application.
Toggle dark/light theme
Your editor can switch to a dark theme or a light theme.
Merge a Shared Scene or Chapter
Merging a scene or chapter creates new scene revision of the scenes that have been shared. When you merge a scene, all of your reviewer's changes and comments will be pulled into the current version of your scene. However, your original content will still be saved as a revision, allowing you to compare the versions and decide what should stay and what should go.

To merge a scene, access the scene on the Chapter board or the Plot board. Click the Options icon  on the scene you want to merge. Then click Open Share Settings on the menu that appears. A dialog appears with the share link that was previously created for the scene. Click Merge. A confirmation dialog appears, letting you know that merging the shared scene will copy everything from the edited scene to your original scene. Your original scene will be saved as a revision. Click Okay. The merge dialog closes, and a new version of your scene appears in the editor.

To merge a chapter, access the chapter on the
Chapter board. Click the Options icon  at the top of the chapter card that you want to merge. Then click Open Share Settings on the menu that appears. A dialog appears with the share link that was previously created for the chapter.
Click
Merge. A confirmation dialog appears, letting you know that merging the shared chapter will copy everything from the edited scenes to your original scenes. Your original scenes will be saved as revisions.
Click
Okay. The merge dialog closes, and a new version of your chapter appears in the editor.

If you want to compare the original version of your scene to your reviewer's merged version, you can view the scene revisions for the scene. For more information about scene revisions, refer to Scene revisions.

Import & Export

You can import documents from Microsoft Word directly into NovelPad, allowing you to seamlessly transition your existing work into NovelPad if you were previously working on a different platform. You can also download your entire novel from NovelPad into Word, Markdown, or ePub, as well as an individual chapter into Word.

Tips for Importing
Images.
Remove any images from the Word document. Images currently can't be added to a novel.
Attempting to upload a Word document with embedded images will stop the import.

Import chapter headings.
To import chapter headings, format your chapter headings with the Heading 1 style in Word.
One quick way to double check if your chapter headings are formatted correctly is by using Word's Navigation Pane. If you don't see a chapter's heading in the Navigation Pane, then your chapter headings don't have the Heading 1 style applied.

Import scene breaks.
To import scene breaks, insert a new line and add a number sign (#) in between each scene.

Title and description.
Add a title and description at the top of your Word document.Import a novel from Microsoft WordExport a chapterExport a novel
Import a Novel from Microsoft Word
To import a Word document, click Import from Word on the Bookshelf. Then select the file to import from your file explorer.

When you import the document, a new novel containing the contents of the document will appear on your Bookshelf.
If you don't see anything happen immediately, hold tight for a few moments. If you have a large file, it can take a minute or so for the novel to process.
Export a Chapter
You can export an individual chapter in Word format. Exporting a chapter exports all of the scenes in that chapter card.

To export a chapter, click the Options icon  at the top of the chapter card. Then click Export to Word.

The file will be labeled "novel" by default, but the contents will include only the scenes in the chapter that you exported.
Export a Novel
You can export an entire novel in Word, Markdown, or ePub format.

To export a novel, click the Download Novel icon  on the side bar. On the dialog that appears, choose whether you want to download the novel in .docx, Markdown, or ePub format.
Formatting Settings
The Formatting settings determine how your Manuscript looks as you write. Any option you choose in the Formatting section will be reflected in the Preview box, allowing you to see how the setting looks before you return to writing. The following options are available in the Formatting section.
Line Spacing
Indicate how far apart you want your lines of text to be from each other.
Paragraph Spacing
Indicate how far apart you want your paragraphs to be from each other.
Font Family
Select the font you want your text to appear in.
Font Size
Select the size for your text.
Indent Size
Indicate how much of an indent you want at the start of a new paragraph.
Unindent First Paragraph
Indicate whether you want an indent at the start of a new paragraph.
Default Text Alignment
Indicate the default text alignment, such as justified or left-aligned. Alignment can be changed for individual paragraphs using the formatting options in the editor.
Page Width
Indicate how wide you want your pages to be.
Editor Settings
The Editor section includes settings for the editor theme, how the editor scrolls as you write, and whether you want spelling and grammar checks enabled. The following options are available in the Editor section.
Theme
Select a Dark or Light theme.
Typing Mode
Select a typing mode. In Typewriter mode, your cursor stays on the same line (or physical location) on your screen and the text automatically scrolls as you write. In Standard mode, your cursor progresses to the next line on the page until the end of the page is reached.
Spelling & Grammar Checking
Enable or disable spelling and grammar checks. If checks are enabled, you can further choose whether to show suggestions for spelling, grammar, and style. Suggestions are provided using ProWritingAid.
Smart Quotes
Enable or disable smart quotes. When enabled, this feature automatically replaces all of the straight quotation marks in your novel with smart quotes (also knows as curly quotes).
Scene Color Labels
Color labels can be useful for grouping your scenes into custom categories. You can create custom labels, allowing you to use color labels in any way you can think of.

Here are some of the ways our users have gotten creative with color tags:
- Keep track of which scenes you need to draft, revise, or edit
- Track the character or POV for a scene
- Indicate the mood of a scene
- Track when you've introduced a new character or location
Create a Color Label
Color labels are created in the Scene Color Labels section on the Settings screen. The Settings screen comes preloaded with five default color labels, but you can delete these or change the colors as you please.

To create a new color label, click the Add button . A color picker will appear, where you can select a color for the label using the slider or by entering a hex code. Once you've selected your color, click Add. Then click the empty label and enter a new label for the color.
Remove a Color Label
To remove a color label from a scene, click the Options icon  on the scene card. Then select the Clear Color icon  on the menu that appears.
Onboarding Tutorial
Click Restart to start a guided walkthrough of NovelPad. This is the same tutorial you saw when you first accessed NovelPad. You can revisit the tutorial at any time.

FAQs

Save and recover content

Help! I accidentally deleted a scene and decided I want it back! How can I recover it?

Relax! No scenes in NovelPad can truly be deleted. There are multiple ways to recover your work, depending on how you deleted it.

- If you removed a scene from a card on the Chapters board or Plots board, you can reinsert the scene from the Archive.

- If you deleted a scene from a card on the Chapters board or Plots board, you can reinsert the scene from the Trash.

- If you made any other sort of deletion (text, for example), you can always rewind your novel to the time before you made the deletion.

What's the difference between the Archive and the Trash?

We like to think of the Archive as the space where you keep scenes you may want. For example, maybe you write a one-off scene but aren't sure where it goes in the plot yet or which chapter it should go in. If you've removed the scene from a chapter card or plot card, the scene will hang out in the Archive.

Sending a scene to the Trash does not actually delete any work, but you can think of the Trash more as the space where you keep scenes you are sure you don't want. For example, maybe you write something that is just for practice, and you know you don't want it in your novel at all. If you delete the scene from a chapter card or plot card, the scene will be sent to the Trash.

How Often does NovelPad save my work?

NovelPad automatically saves and backs up your work every 30 seconds. However, you can also manually save your work at any time by clicking the Save icon  on the sidebar.

Share Content

Can I change the color of my name in the comments?

Colors for name tags in the Sharing feature are randomly assigned based on your IP address and can't be changed at this time.

Does my reviewer need to create a NovelPad account to view a shared link?

Yes, your reviewer will need to create an Editor version of NovelPad account to view a shared link. Editor accounts are free and a paid subscription is not required to collaborate on share links.

Once they've created an account, they can view future links by simply logging into their existing account. If your reviewer would like to create their own share links or use NovelPad's full features (including spell check and grammar check from ProWritingAid), your reviewer can upgrade to a paid NovelPad account at any time.

What happens if I make changes to a scene that I've shared while an editor is making changes to the scene?

If you make changes while the editor is making changes, you won't lose any work. When you merge the content from your editor, NovelPad merges your editor's content into your original scene and then creates a scene revision with your original content.

If you make changes to a scene that you have already shared, those changes will not appear in the shared scene. If you make changes in a shared scene and want to share those changes, you will need to delete the existing link and create a new share link.

Find and Replace

How do I get to Find and Replace?

Access the find and replace feature at the top right of the screen on any editor view by pressing Ctrl+F on a PC or Cmd+F on a Mac.

Why can't I find a common word using the find and replace feature?

There are certain common words that aren't included in the search functionality, such as "the" and "and". If the word is too common, it may be included on this list and the find and replace feature won't be able to search for it.

Offline Mode

Do I have access to Offline Mode if I'm on the Free Trial?

You have access to all of NovelPad's features on a free trial, including offline mode!

How do I access offline mode?

To access offline mode, you can disable your internet connection and keep on writing. NovelPad automatically detects a loss of internet connectivity and seamlessly saves changes to your device in offline mode. When you're connected to the internet again, NovelPad will automatically sync your work back to the server, no matter how long it's been since the last time you were online.

Subscription and Billing

Where can I manage my Subscription and Billing details?

You can change view, update, manage your subscription from your the Manage Billing button at the bottom of your Account page.

Other

Where can I change the title and author of my novel?

You can change the title, author, and description of your novel in the Manuscript.
Edit the novel title
Edit the author name
Edit the novel description

What's the difference between the Plots Board and the Chapters Board?

The Plots board is where you can organize and manage these scenes in your novel independently of the Chapters board and the Manuscript. Think of the Plots board like a bulletin board where you can group, pin, and arrange your scenes however you want. Where the Chapters board is useful for arranging your scenes into chapters and creating the chronology of your novel, the Plots board can be useful for tracking the scenes in your main plot and your side plots. You could also use the Plots board for tracking the scenes you haven't yet added to your novel. The board, like your novel, is limited only by your imagination!

What's the difference between the Plots Board and the Chapters Board?

NovelPad works on most devices with modern browsers. We officially support and recommend using the following browsers and devices with NovelPad.

Browsers
NovelPad is officially supported on the latest version of the following browsers.
Brave
Chrome
Edge
Firefox
Safari

Operating systems
NovelPad is officially supported on the latest version of the following operating systems.
macOS
iOS
Windows
Android

If you're experiencing any issues with your device or browser using NovelPad, reach out to us.

Can I use browser extensions with NovelPad?

Generally, any browser extension that modifies the content on the browser window can cause unexpected behavior in NovelPad. If you're experiencing issues with performance or any other funky behavior, try disabling any browser extensions you may have enabled. Most browsers allow you to disable browser extensions for specific websites.

What's the hotkey for...?

Check out our Hotkeys topic for a list of all hotkeys you can use in NovelPad.

Hotkeys

NovelPad supports many common hotkeys (or keyboard shortcuts) as well as hotkeys for more NovelPad-specific commands. The following are the available hotkey combinations.

General hotkeys
Ctrl/Cmd+Z
Undo your last action
Ctrl/Cmd+Shift+Z
Redo your last undo
Ctrl/Cmd+A
Select all text
Ctrl/Cmd+F
Access the Find and Replace feature
Formatting hotkeys
Ctrl/Cmd+B
Bold the selected text
Ctrl/Cmd+I
Italicize the selected text
Ctrl/Cmd+U
Underline the selected text
Ctrl/Cmd+Shift+X
Strike through the selected text
Navigation hotkeys
Ctrl/Cmd+Down
Navigate to the end of the current scene
Ctrl/Cmd+Up
Navigate to the beginning of the current scene
Shift+Tab
Navigate to the previous scene
Tab
Navigate to the next scene
Shift+Scroll Wheel
Scroll Sideways
Scene hotkeys
Ctrl/Cmd+Enter
Create a New Scene
Shift+Enter
Split the Current Scene (Only works in Manuscript)
Ctrl/Cmd+Shift+Enter
Split the Current Scene into a New Chapter (Only works in Manuscript)

Release Notes

Check back here frequently to stay up to date with our latest changes and improvements!
Release notes for November 2022

Merge a chapter into the previous chapter
You can now merge a chapter on the Chapters Board into the previous chapter, allowing you to quickly combine chapters where needed. To combine chapters, use the new Merge into Previous Chapter option on a chapter card.
Merging a chapter into the previous chapter moves all scenes from the selected chapter into the chapter before it. For example, suppose you want to merge chapters 1 and 2 in your novel into one chapter. On the chapter 2 card, click the Options icon , and then select Merge into Previous Chapter. The scenes from chapter 2 will move to the chapter 1 card, and the chapter 2 card will be deleted.
Split a Chapter after a Scene
You can now easily split a chapter into two chapters using the new Split Chapter After Scene option on a scene card. This option is helpful if you find yourself with a very long chapter that would work better as two or more chapters, allowing you to quickly split the chapter into two chapters.
To split a chapter, select the last scene card you want to keep in the original chapter. For example, if you want the fourth scene and beyond to be put into a new chapter, select the card for the third scene. Click the Options icon , and then select Split Chapter After Scene. The scenes after the selected scene will be removed from that chapter and moved to a new chapter card.
New Hotkeys
We've added a new hotkey to split a chapter in the Manuscript. Press Ctrl/Cmd+Shift+Enter to split a chapter.

We've added a new hotkey to split a scene. Press Ctrl/Cmd+Enter to split a scene.

For a complete list of hotkeys available in NovelPad, check out our new Hotkeys topic!
Performance improvements
We've improved the performance of the Find/Replace feature, increasing speed to a nearly instant rate of about 1,000 matches per 100,000 words.

We've made various improvements to the performance of the ProWritingAid integration.

The text editor now performs without lag in a novel up to 250,000 words. Please note there may still be lags if all 250,000 words are in one scene.
Bug fixes
All Android bugs (that we were aware of as of this release) have been fixed.

When you add a comment to a scene in Editor view, the cursor selection now automatically moves to the new comment.