Tag scenes
There are multiple ways you can tag a scene, all of which can help you keep your scenes organized or grouped in a way that suits your needs. You can tag scenes with the following information.
Color label. Tag a scene with a color label to group scenes for any reason you can imagine. You can choose your own colors and add your own labels, allowing you to use color labels in any way you can think of.
Location. Tag a scene with a location to keep track of where a scene takes place. You can then see all scenes that happen in a certain location grouped together on the Locations board.
Date. Tag a scene with a date to keep track of the time line in your novel. Once you've tagged scene cards with dates, you can use the dates to create different views on the Insights board.
Color labels
Color labels can be useful for grouping your scenes into custom categories. You can create custom labels, allowing you to use color labels in any way you can think of.
Here are some of the ways our users have gotten creative with color tags.
Keep track of which scenes you need to draft, revise, or edit
Track the character or POV for a scene
Indicate the mood of a scene
Track when you've introduced a new character or location
Color labels are created in the Scene Color Labels section on the Settings screen. The Settings screen comes preloaded with five default color labels, but you can delete these or change the colors as you please.
To create a new color label, click the Add button  . A color picker will appear, where you can select a color for the label using the slider or by entering a hex code. Once you've selected your color, click Add. Then click the empty label and enter a new label for the color.

To tag a scene with a color label, click the Options icon ![]() on the scene card you want to tag. Then select the color label on the menu that appears. Click anywhere out of the menu to save your selection.
on the scene card you want to tag. Then select the color label on the menu that appears. Click anywhere out of the menu to save your selection.

To remove a color label from a scene, click the Options icon ![]() on the scene card. Then select the Clear Color icon
on the scene card. Then select the Clear Color icon  on the menu that appears.

Location tags
If you want to track locations in your novel on the Locations board, you'll need to tag your scenes with locations. This process requires creating a location and then tagging a scene with that location.
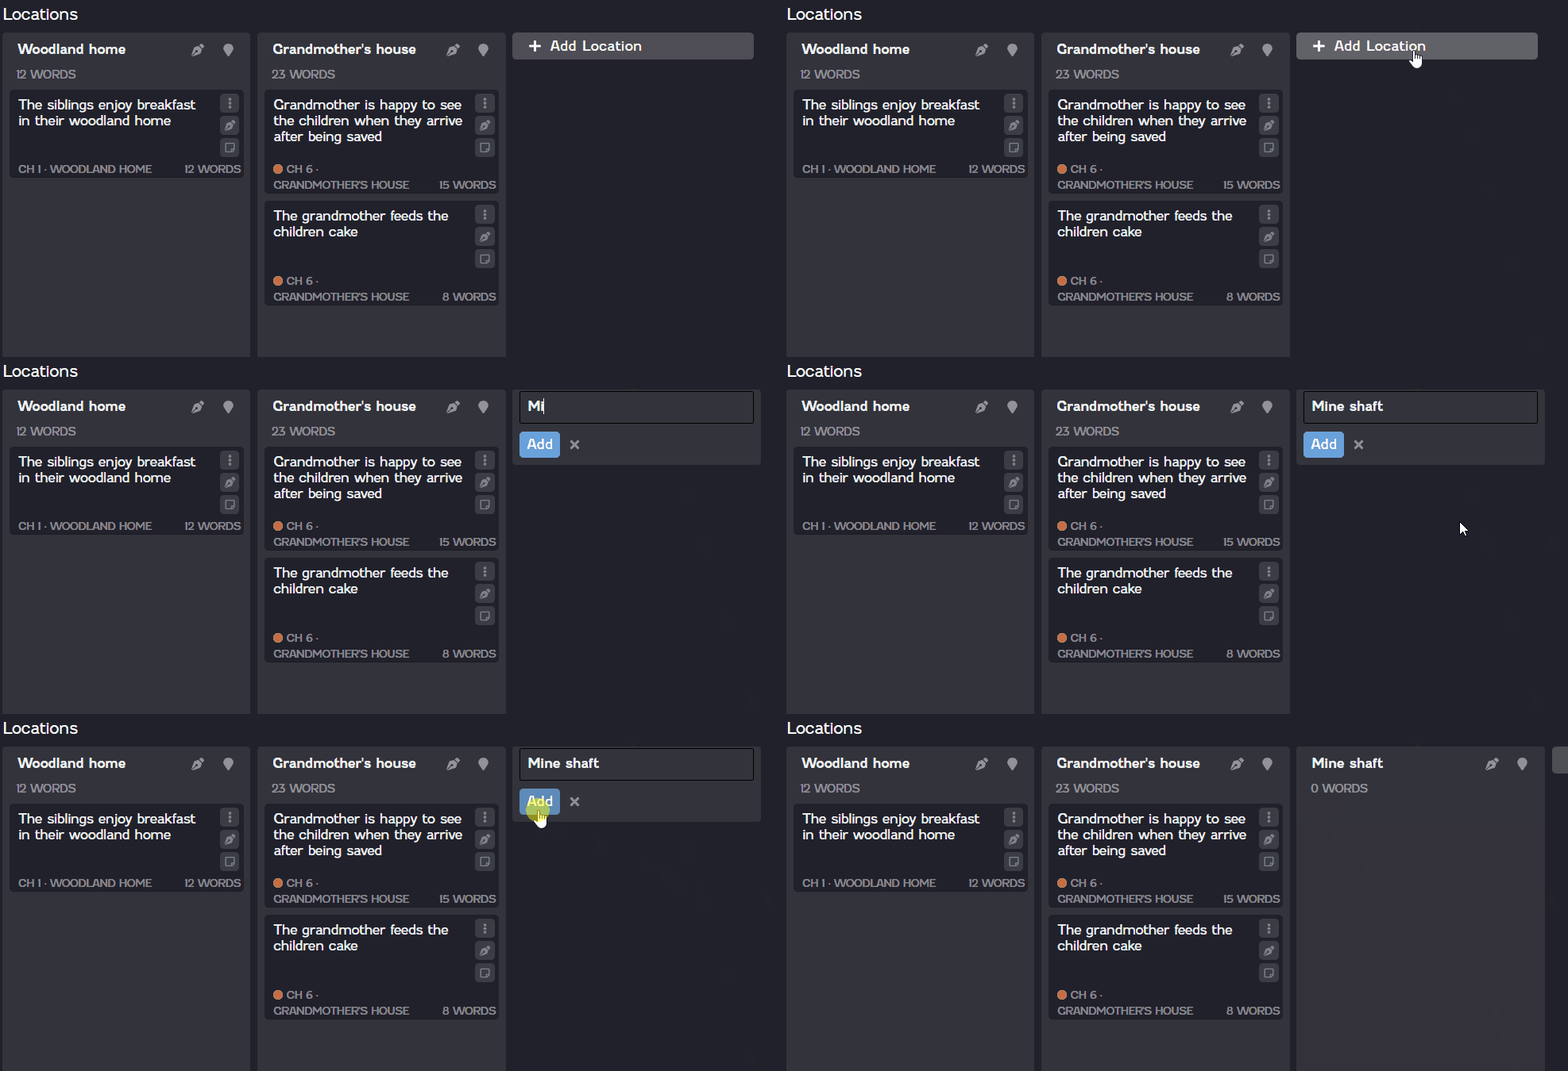
To create a location, head to the Locations board. Click Add Location. In the new card, enter a name for the location. Then click Add.

Once you've added the location you want to track, you can tag scenes in your novel with that location. When a scene is tagged with a location, the scene will display in the corresponding location card on the Locations board.
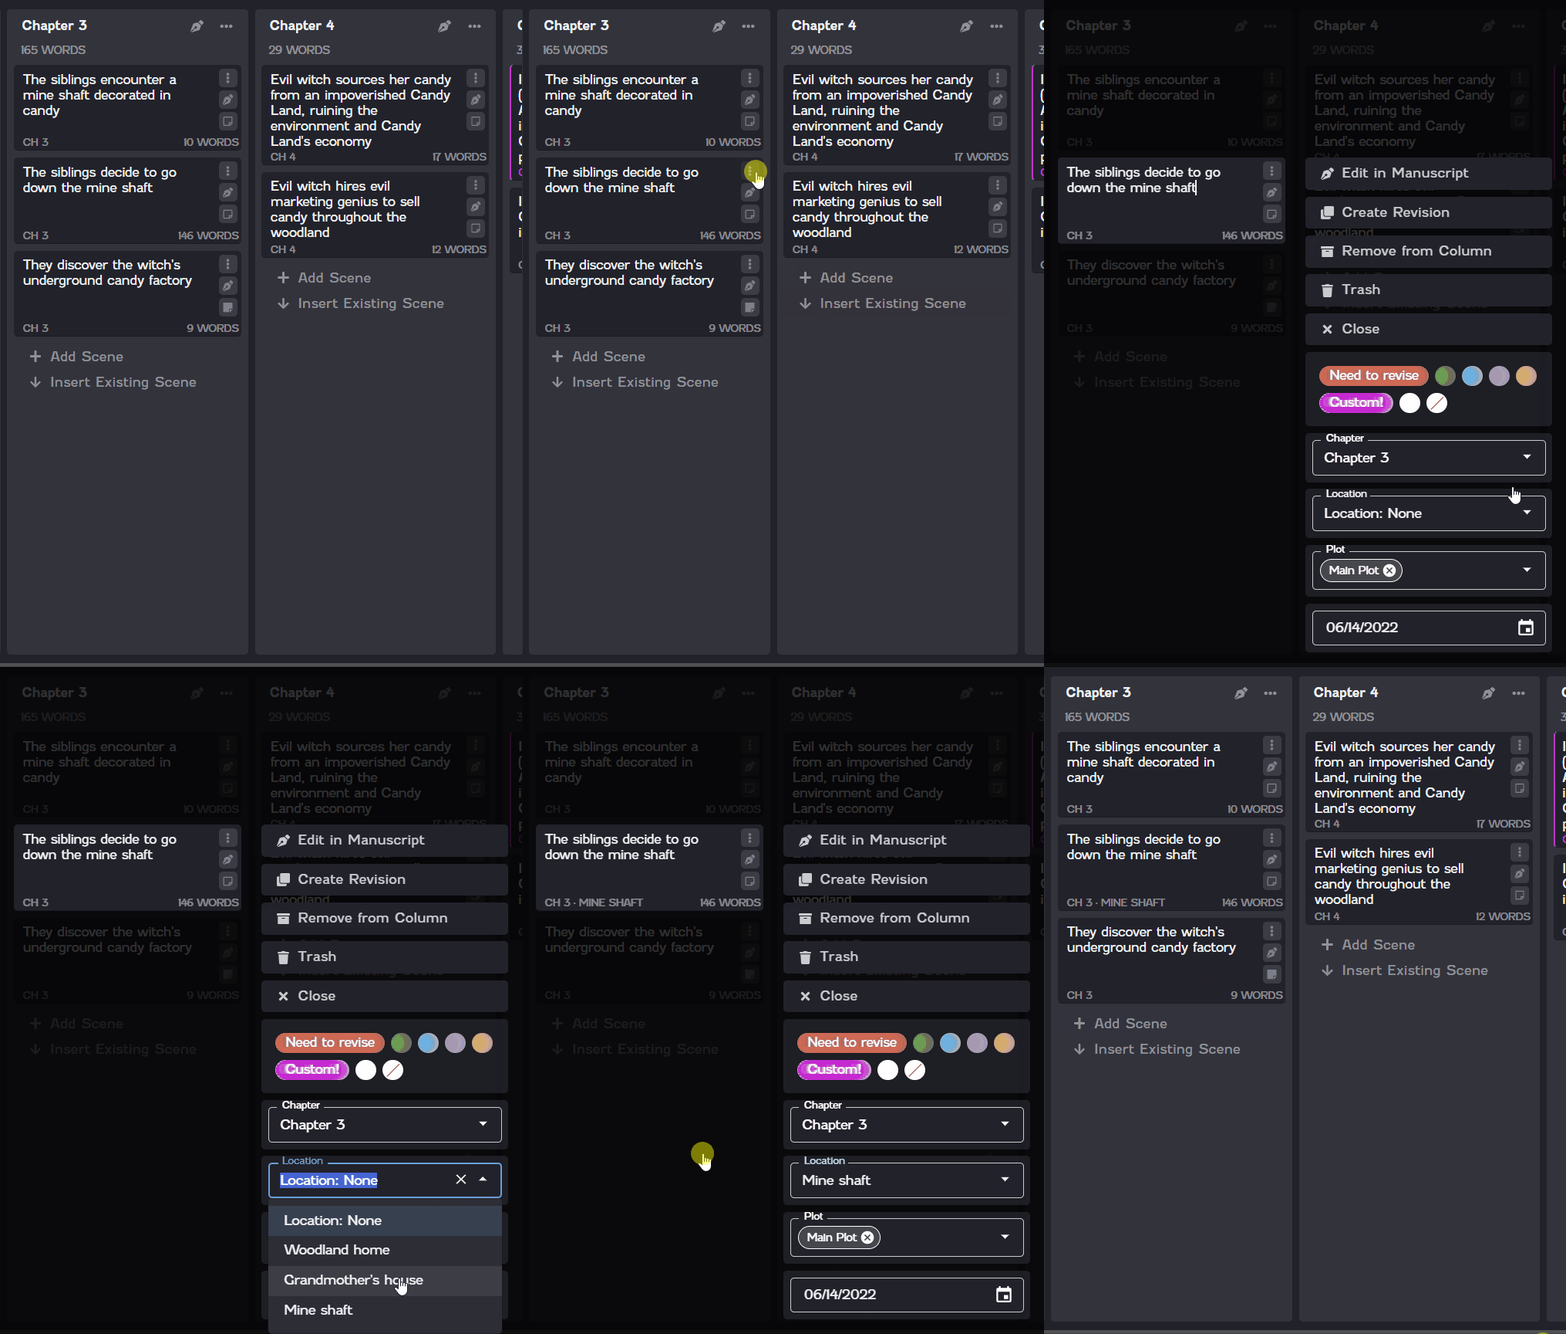
To tag a scene with a location, click the Options icon ![]() on the scene card you want to tag. Click the Location drop-down on the menu that appears, and then select the location you want to tag the scene with. Click anywhere out of the menu to save your selection.
on the scene card you want to tag. Click the Location drop-down on the menu that appears, and then select the location you want to tag the scene with. Click anywhere out of the menu to save your selection.
Once you tag a scene card, you'll see the location appear in the details on the scene card. The scene card will also now display on the location card on the Locations board.

To remove a location tag, you can either click the Clear icon ![]() on the Location field or you can select Location: None from the drop-down menu.
on the Location field or you can select Location: None from the drop-down menu.

Date tags
You can tag scenes with dates to help keep track of the time line in your novel. This can be useful, perhaps, if you're writing flashbacks in a character's life or if you're writing a mind-bending time travel book. Once you tag scene cards with dates, the dates can be tracked on the Insights board.
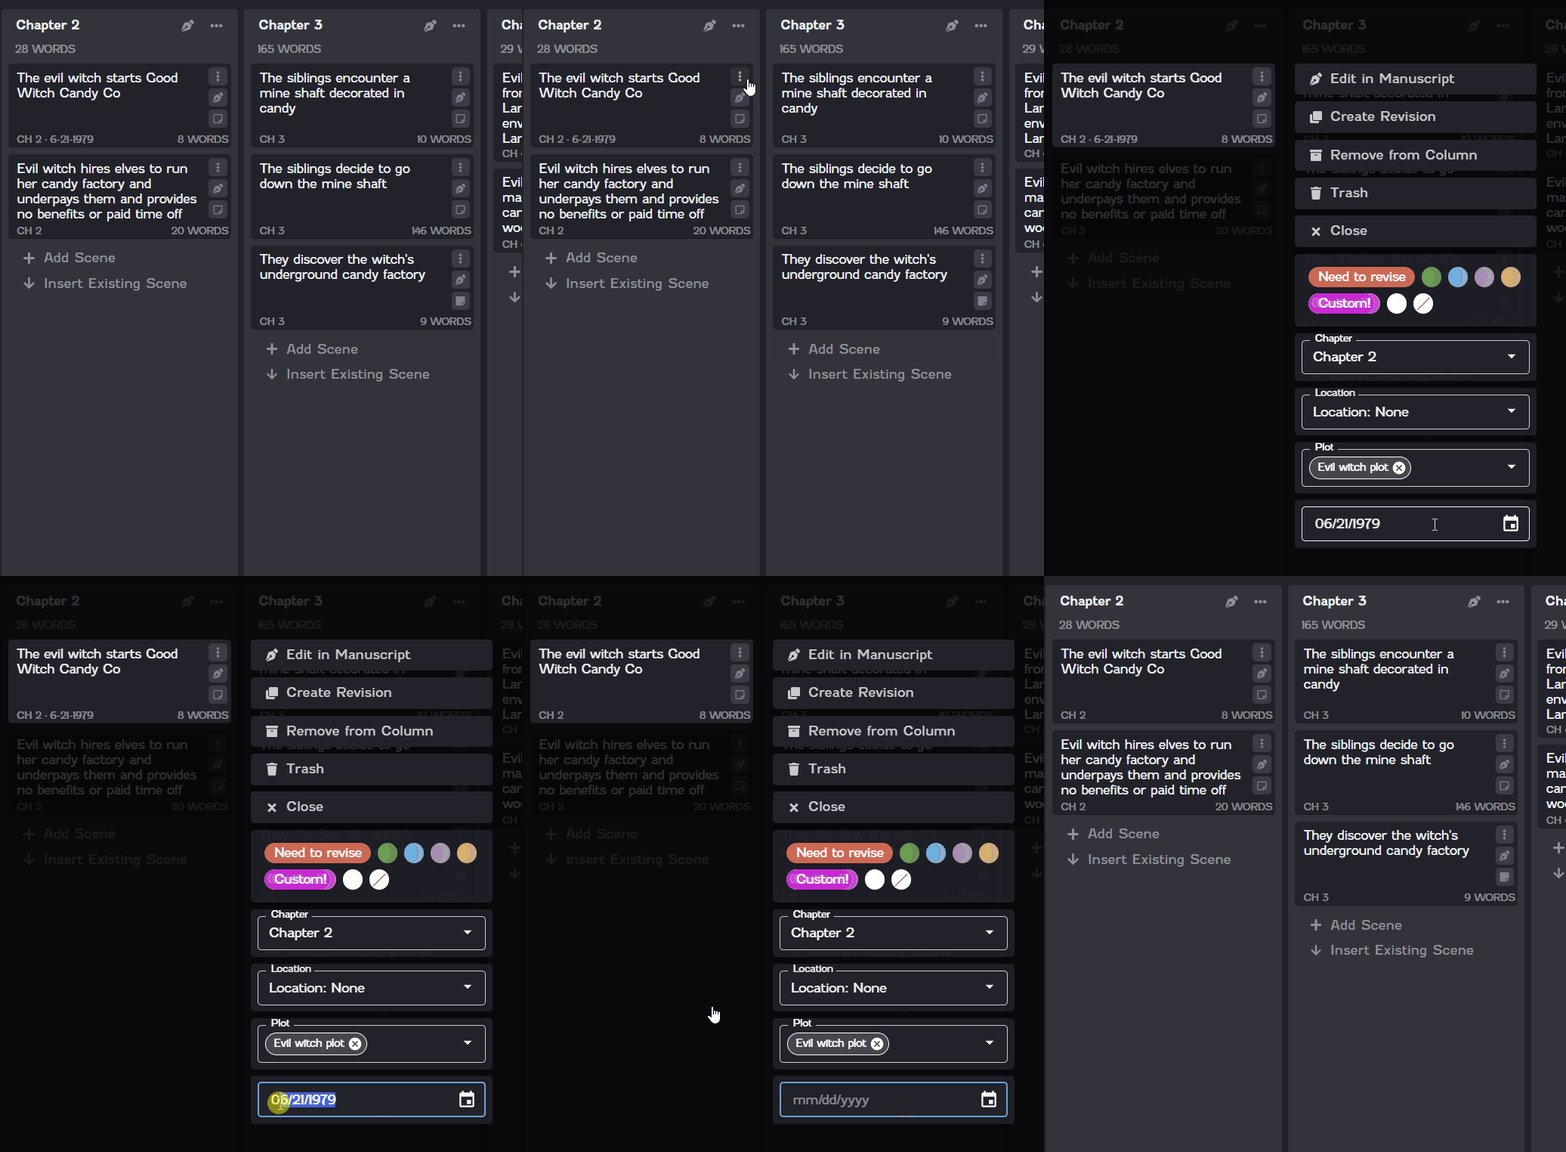
To tag a scene with a date, click the Options icon ![]() on the scene card you want to tag. Click the Date field to show a calendar, where you can select the date you want to assign to the scene. You can also directly type the date into the Date field. Click anywhere out of the menu to save your selection.
on the scene card you want to tag. Click the Date field to show a calendar, where you can select the date you want to assign to the scene. You can also directly type the date into the Date field. Click anywhere out of the menu to save your selection.

Once you've added dates to your scenes, you can view your scenes by date on the Insights board. This can be helpful for insights such as seeing the spread of your dates throughout your chapters or seeing which characters appear in which date. The Insights board is designed for flexibility, and dates are one detail you can use for whatever you might need.
For example, viewing Chapters by Date allows you to see the order your in which your dates are written.

To remove a date tag, click the Options icon ![]() on the scene card. Click in the Date field, highlight the current date on the scene card menu, and then press the Backspace or Delete key.
on the scene card. Click in the Date field, highlight the current date on the scene card menu, and then press the Backspace or Delete key.
